OpenXgram 사용 설명서
OpenXgram user manual
GUI 9 탭 각각의 개요 · 화면 요소 번호 · 시나리오 · 팁 · 에러 · CLI 매핑을 한 페이지로 정리했습니다. Quickstart 가 명령 카탈로그라면, 이 페이지는 "이 화면에서 무엇을 누르면 무엇이 나오는가" 를 그림과 함께 보여줍니다.
One page covering every GUI tab — overview · numbered screen elements · scenarios · tips · errors · CLI mapping. Quickstart is the command catalog; this page shows "press X on this screen, see Y" with pictures.
※ 모든 GUI 스크린샷은 실 Tauri Solid 컴포넌트를 헤드리스 Chromium 으로 렌더한 결과입니다. 데스크톱 Tauri 와 시각적으로 동일하며 (둘 다 blink/webkit 계열), 노출된 데이터는 샘플입니다. 화면 요소 번호는 실 컴포넌트 소스 의 입력 필드·버튼·결과 패널을 그대로 추출해 매겼습니다.
Note — every GUI screenshot is the real Tauri Solid components rendered by headless Chromium. Visually identical to the desktop Tauri shell (both blink/webkit), with sample data. Numbered elements were extracted directly from the actual component source: inputs, buttons, result panels.
최신 release 의 신규 기능
What's new in the latest release
아래 명령들은 9 탭 GUI 외에 CLI 로만 사용. 자세한 시연 흐름은 22-step demo plan (/demo/) →
CLI-only commands beyond the 9 GUI tabs. See the full flow: 22-step demo plan (/demo/) →
xgram bot add/start/list/link/remove— 1머신 N봇 first-class (MCP server 자동 spawn + 토큰 + .mcp.json 스니펫)xgram invite/xgram friend accept <oxg-friend://...>— 친구 초대 QR/link + 자동 handshakexgram human pending/respond— HITL (봇이 사람 호출 → Discord/Telegram push)xgram openagentx call @agent "prompt" --pay <micros>— OpenAgentX 마켓 호출 + USDC payment_intentxgram payment summary— 수익 대시보드 (수신/송신/순수익)xgram find @h/xgram directory register --to <url>— 핸들 디렉터리 + 등록xgram channels add/list/remove+xgram send @h "body"— 다채널 라우팅 (Discord/Telegram/xgram-peer/...)xgram session import-app <file> --format chatgpt|gemini|claude-code— 외부 LLM 앱 export 메모리 통합xgram session transcript <id> --format claude|chatgpt|gemini— 다른 앱에 복붙 가능한 transcript 출력xgram eas list/count— EAS 어테스테이션 (평판 backbone)
인터페이스 선택 — CLI · TUI · GUI
Pick your interface — CLI · TUI · GUI
같은 데몬, 같은 ~/.openxgram/ 데이터. 어떤 인터페이스로 들어가도 결과는 같습니다. 상황에 맞춰 고르세요.
One daemon, one ~/.openxgram/. Whichever surface you pick, the result is the same. Choose by context.
CLI
xgram <cmd> — 자동화·CI·파이프
xgram <cmd> — automation, CI, pipes
- 스크립트·AI 하네스(Claude Code · Cursor · Aider) 통합
- Scripts, AI harness (Claude Code · Cursor · Aider)
- SSH·서버·CI 환경에서 그대로 작동
- Works on SSH / servers / CI
- 다른 도구와 stdin/stdout 으로 연결
- Composable via stdin/stdout
TUI
xgram tui — 터미널 안의 대시보드
xgram tui — dashboard inside your terminal
- GPU·GUI 라이브러리 없는 환경 (서버·SSH)
- No-GPU / no-GUI environments (servers, SSH)
- 설치 manifest 빠른 확인
- Quick install-state check
- 키바인딩 Q/Esc 종료
- Quit with Q/Esc
GUI
Tauri 데스크톱 앱 — 9 탭 시각 인터페이스
Tauri desktop app — 9-tab visual interface
- 처음 사용자 · 봇 토큰 마법사 · 라이브 채널 stream
- First-time users · bot wizard · live channel stream
- Vault 30초 reveal 카운트다운, MFA 다이얼로그
- Vault 30s reveal countdown, MFA dialog
- 같은 데몬 / 같은 데이터 / 같은 결과
- Same daemon / same data / same result
이 설명서에서 다루는 9 탭
The nine tabs covered here
- 1. 시작하기 (Onboarding) — 3 단계 환영 카드1. Onboarding — 3-step welcome cards
- 2. 기억 (Memory) — 5 층 검색2. Memory — 5-layer search
- 3. Vault — 자격증명 승인 + 30초 reveal3. Vault — credential approval + 30s reveal
- 4. 피어 (Peers) — 머신·에이전트 등록4. Peers — register machines / agents
- 5. 알림 (Notify) — Discord/Telegram 봇 마법사5. Notify — Discord / Telegram bot wizard
- 6. 채널 (Channel) — 다중 에이전트 라이브6. Channel — live multi-agent hub
- 7. 예약 (Schedule) — once / cron7. Schedule — once / cron
- 8. 체인 (Chain) — YAML 워크플로우8. Chain — YAML workflows
- 9. 설정 (Settings) — USDC 일일 한도9. Settings — USDC daily limit
- 10. GUI ↔ CLI 1:1 매핑10. GUI ↔ CLI 1:1 mapping
- 11. 트러블슈팅11. Troubleshooting
1. 시작하기 — 3 단계 환영 카드
1. Onboarding — 3-step welcome cards
A · Overview
Onboarding 탭은 첫 실행 직후 가장 먼저 보이는 화면입니다. 신원 초기화 → 시드 백업 → 알림 연결의 3 단계를
카드로 안내하고, "초기화 상태 다시 확인" 버튼으로 is_initialized 를 폴링해 초기화 완료 배지가 켜지는 순간을 표시합니다.
초기화가 감지되면 GUI 가 자동으로 Memory 탭으로 전환되므로 이 탭은 사실상 일회성입니다.
처음 OpenXgram 을 까는 사람, 새 머신에 동기화하는 사람, 시드를 분실해 다시 init 한 사람에게 유용합니다.
The Onboarding tab is the first thing you see on launch. Three cards guide identity init, seed backup, and notification pairing.
"Re-check initialization" polls is_initialized until the Initialized badge flips on.
Once detected, the GUI auto-switches to the Memory tab — this tab is effectively one-shot.
Useful for fresh installs, syncing to a new machine, or after a seed-loss re-init.
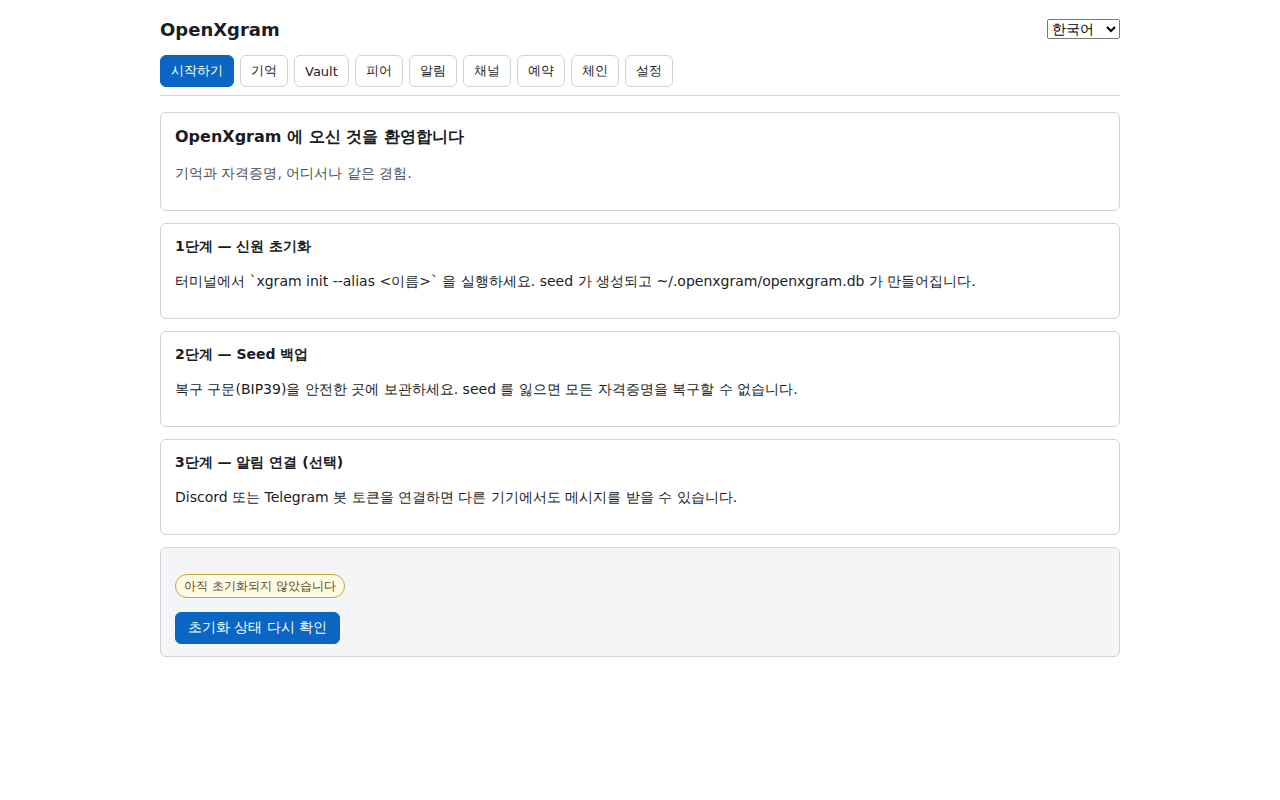
- 제목 카드 — "OpenXgram 에 오신 것을 환영합니다" + 한 줄 부제 (i18n key
onboarding.title/subtitle). - Title card — "Welcome to OpenXgram" + one-line subtitle (i18n keys
onboarding.title/subtitle). - Step 1 카드 — 신원 초기화. 터미널에서
xgram init --alias <name>실행 안내. - Step 1 card — initialize identity. Tells you to run
xgram init --alias <name>. - Step 2 카드 — BIP39 12 단어 시드 백업. 잃으면 vault 복구 불가.
- Step 2 card — back up the 12-word BIP39 seed. Lose it, lose the vault.
- Step 3 카드 — Discord/Telegram 알림 연결 (선택). Notify 탭으로 안내.
- Step 3 card — pair Discord/Telegram (optional). Points to the Notify tab.
- 상태 배지 — 초기화 안 됨 또는 초기화 완료.
is_initializedinvoke 결과 반영. - Status badge — Not initialized or Initialized. Reflects
is_initializedinvoke. - "초기화 상태 다시 확인" 버튼 —
refetch()호출. 터미널에서 init 한 직후 누릅니다. - "Re-check initialization" button — calls
refetch(). Press right after running init in your terminal.
각 필드에 어떤 값을 어떻게 입력하는지, 그리고 클릭 순서.
입력 예시
- alias 의 의미 — 이 기기를 부를 본인용 이름. 한 사용자가 노트북·데스크톱·서버 여러 대를 같은 마스터 신원으로 묶을 때 어느 기기에서 일어난 일인지 구분하는 라벨. 메모리 출처·Vault ACL·감사 로그 서명 메타데이터에 박힙니다. 글로벌 식별자 아님 (그건
did:key). - alias 입력 (자유 선택) —
my-laptop·home-server·work-mac·macbook-air·gcp-vm-tokyo등 본인이 알아보기 좋은 이름.my-laptop은 그대로 따라 쓰는 게 아니라 예시.
권장:[a-z0-9-]만 사용 (영문/숫자/하이픈)
잘못된 예:My Laptop(공백) ·내 노트북(한글) ·laptop!(특수문자) · 빈 값
클릭 순서
- 초기 화면에서 안내 카드 읽기 (3 카드: 환영 · 시드 백업 · 알림 연결)
- 터미널을 열어
xgram init --alias my-laptop실행 - 출력된 12 단어 시드를 종이·암호 매니저에 안전하게 저장 (분실 시 복구 불가)
- GUI 로 돌아와 "준비됐어요" 클릭 → Memory 탭으로 자동 이동
Exact values per field, plus click order.
Field examples
- What alias means — your own name for this machine. When one user runs OpenXgram on several devices under the same master identity, the alias labels which device an event came from. It ends up in memory provenance, Vault ACL whitelist, and audit-log signatures. It is not a global identifier (that's
did:key). - alias input (free choice) —
my-laptop·home-server·work-mac·macbook-air·gcp-vm-tokyo— anything that helps you recognise the device.my-laptopis an example, not a literal value.
Recommended:[a-z0-9-]only (ASCII letters/digits/dash)
Wrong:My Laptop(space) ·laptop!(special char) · empty
Click order
- Read the 3 welcome cards (welcome · seed backup · notify hookup)
- In a terminal:
xgram init --alias my-laptop - Save the 12-word seed offline (paper / password manager) — losing it means no recovery
- Return to GUI and click "Ready" → auto-jumps to Memory tab
- GUI 실행 → Onboarding 탭이 자동 표시.
- Launch the GUI → Onboarding tab opens automatically.
- 다른 터미널에서
xgram init --alias myname. - In a separate terminal:
xgram init --alias myname. - 화면에 출력된 12 단어 BIP39 시드를 종이에 적어 금고에 보관.
- Write the 12-word BIP39 seed on paper, lock it away.
- GUI 의 "초기화 상태 다시 확인" 클릭 → 배지 초기화 완료.
- Click "Re-check initialization" → badge flips to Initialized.
- 새 머신에 OpenXgram 설치 → GUI 첫 실행.
- Install OpenXgram on the new machine → first GUI launch.
- 터미널에서
xgram init --restore-seed후 12 단어 입력. - In a terminal:
xgram init --restore-seed, type the 12 words. - "초기화 상태 다시 확인" 클릭.
- Click "Re-check initialization".
- Step 1·2 완료 → 자동으로 Memory 탭.
- Finish step 1·2 → auto-jump to Memory.
- "알림 (Notify)" 탭으로 이동 → BotFather 토큰 등록.
- Switch to "Notify" → register a BotFather token.
- "Channel" 탭에서 어댑터 연결됨 확인.
- In "Channel" verify configured badge.
- "초기화 상태 다시 확인" 은 invoke 가 무거운 작업이 아니므로 부담 없이 여러 번 눌러도 됩니다.
- "Re-check initialization" is cheap — press it as many times as you like.
- F12 로 devtools 를 열면 invoke 호출이 그대로 console 에 보입니다 (Tauri dev build 한정).
- Open devtools with F12 in dev builds to inspect invoke calls.
- 이 탭은 이미 init 된 시스템에선 1 초 안에 사라집니다 — Memory 탭이 첫 화면처럼 느껴지는 이유.
- On already-initialized systems this tab self-dismisses within 1s — that's why Memory feels like the home screen.
원인·해결: 데몬이 다른 사용자 권한으로 실행 중이거나, ~/.openxgram/ 권한이 600 이 아닐 때. ls -la ~/.openxgram/ 로 소유자·권한 확인 → chmod -R u+rwX,go-rwx.
Cause / fix: daemon running as another user, or ~/.openxgram/ not 600. Check with ls -la ~/.openxgram/; fix via chmod -R u+rwX,go-rwx.
원인·해결: queueMicrotask 가 한 번만 동작 (autoSwitched 플래그). 다른 탭을 한 번 클릭한 뒤 돌아왔다면 수동으로 Memory 탭을 눌러야 합니다.
Cause / fix: queueMicrotask fires once (autoSwitched flag). After clicking a tab, switch back manually.
CLI: xgram init --alias myname · xgram init --restore-seed · xgram status (--help 로 옵션 전체 보기) · TUI: xgram tui 첫 화면이 동일한 init 상태 카드 · Guide: /guide/ #tutorial-1
CLI: xgram init --alias myname · xgram init --restore-seed · xgram status (run with --help for all flags) · TUI: xgram tui opens the same init card · Guide: /guide/ #tutorial-1
2. 기억 — 5 층 메모리 검색
2. Memory — 5-layer search
A · OverviewMemory 탭은 OpenXgram 의 핵심 — L0 메시지 / L2 기억 / L4 정체성 세 레이어를 한 번에 의미 검색합니다. BGE-small 임베딩 + sqlite-vec 가 score 를 계산하고, 입력은 300ms 디바운스로 자동 트리거되어 매 키 입력마다 호출되지 않습니다. "어떤 회의에서 무슨 결정이 있었지?" "이 사람이 누구더라?" 같은 자연어 질문에 적합하며, 자동화·스크립트가 아닌 대화·회상 흐름의 1차 도구입니다.
Memory is the heart of OpenXgram — semantic search across L0 messages / L2 memories / L4 traits in one box. BGE-small embeddings + sqlite-vec compute scores; the input is debounced 300ms so it doesn't fire on every keystroke. Best for natural-language questions like "what was decided in that meeting?" or "who is this person?" — the primary conversation / recall tool, not for automation.
B · Screen elements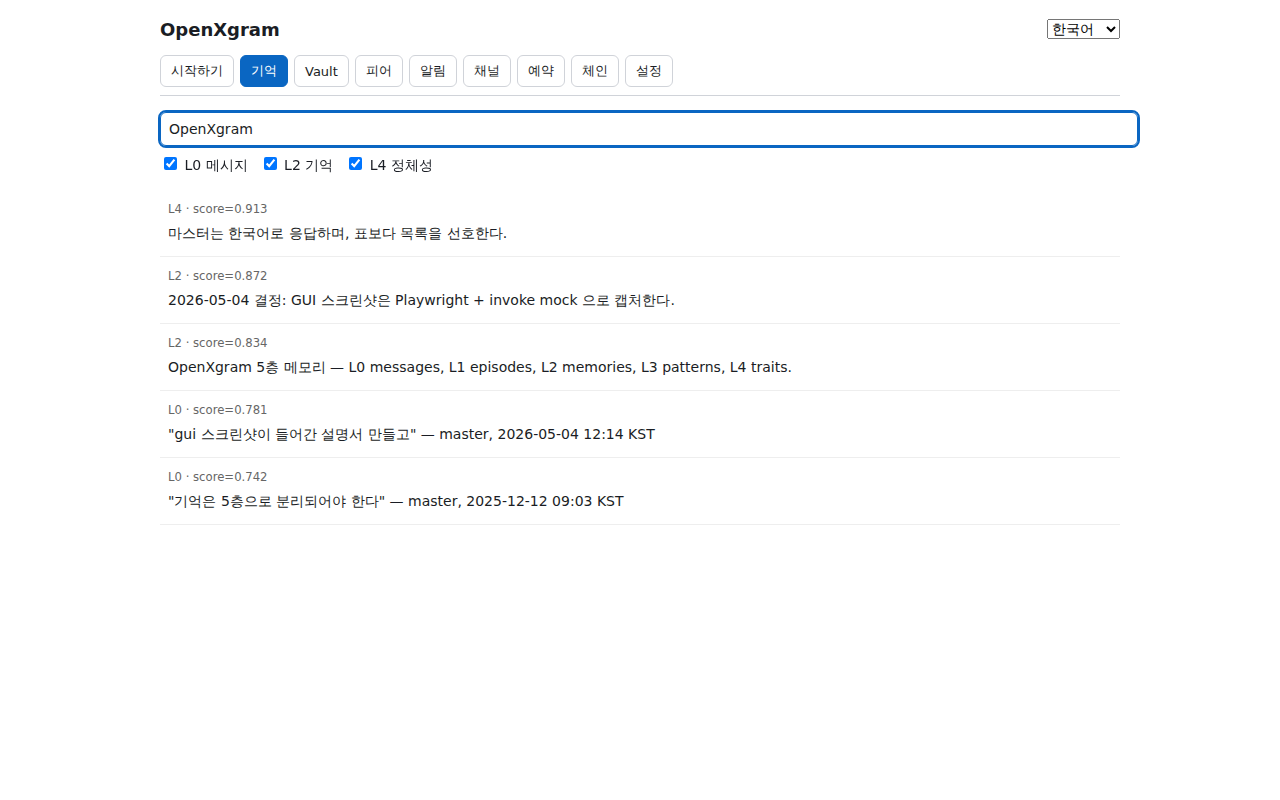
- 검색 입력창 — placeholder "Search query (debounced 300ms)". 빈 문자열이면 결과를 즉시 비웁니다.
- Search input — placeholder "Search query (debounced 300ms)". Empty input clears results.
- L0 체크박스 — 원시 메시지 (chat·로그). 기본값 켜짐.
- L0 checkbox — raw messages (chat / log). Default on.
- L2 체크박스 — 사실·결정·rule 형태의 기억. 기본값 켜짐.
- L2 checkbox — facts / decisions / rules. Default on.
- L4 체크박스 — 정체성·성향. 야간 reflection 으로 도출. 기본값 켜짐.
- L4 checkbox — traits / personality, derived by nightly reflection. Default on.
- 결과 카드 리스트 — score 내림차순. 각 카드에
id·layer·body·score. - Result cards — sorted by score desc. Each shows
id·layer·body·score. - 로딩 인디케이터 — invoke 진행 중 표시. 일반적으로 100~300ms 내 사라짐.
- Loading indicator — visible while invoke is in flight (typically 100–300ms).
각 필드에 어떤 값을 어떻게 입력하는지, 그리고 클릭 순서.
입력 예시
- 검색 입력창 —
결제 자동화·사용자 페르소나·RBF tip(자유 텍스트, 한글/영문 혼용 OK)
잘못된 예: 비워두면 결과 없음 (필수 1자 이상) - L0 / L2 / L4 체크박스 — 원하는 계층만 켜기. 처음엔 모두 켜기 (3개 체크). 좁히려면 L2(중요 사실)만
잘못된 예: 0개 켜면 결과 없음
클릭 순서
- 검색 입력창에 키워드 입력 (예:
결제 자동화) - 타이핑을 멈춘 뒤 0.3초 자동 검색 (직접 클릭 불필요)
- 결과 카드에 score (0~1, 높을수록 관련) + sender + 본문 표시
- 필요하면 L0/L2/L4 체크 박스로 계층 좁히기
Exact values per field, plus click order.
Field examples
- search input —
payment automation·user persona·RBF tip(free text, KR/EN mix OK)
Wrong: Empty input returns nothing (need at least 1 char) - L0 / L2 / L4 checkboxes — Turn on layers you want. Start with all 3 ON. Narrow by leaving only L2 (key facts)
Wrong: All OFF returns nothing
Click order
- Type a keyword (e.g.
payment automation) - Search auto-runs 0.3s after you stop typing — no click needed
- Result cards show score (0~1, higher = more relevant), sender, body
- Narrow layers via L0/L2/L4 checkboxes
- 입력창에 "지난 주 결제 한도 결정" 입력.
- Type "last week payment cap decision".
- L0 체크 끄기, L2·L4 만 켬 → 결정만 남김.
- Toggle L0 off, leave L2·L4 → decisions only.
- 최상위 결과의 score · body 확인.
- Inspect top result's score & body.
- 키워드 입력 후 L0+L2 만 켜기.
- Enter keyword, leave only L0+L2 on.
- L0 메시지(원본)와 L2 기억(요약)이 score 순으로 섞여 나옴.
- Raw L0 messages and summarized L2 memories interleave by score.
- 각 카드의 body 를 따라 시간순으로 사건 재구성.
- Reconstruct the event chronologically by reading body fields.
- "보안 선호" 또는 "선호하는 어투" 입력.
- Type "security preference" or "tone preference".
- L0·L2 끄고 L4 만 남김.
- Disable L0·L2, keep L4.
- 야간 reflection 이 도출한 trait 카드 확인.
- See trait cards distilled by nightly reflection.
- 입력은 300ms 디바운스 — 빠르게 타이핑해도 한 번만 호출됩니다.
- The 300ms debounce coalesces rapid typing into one call.
- 모든 체크박스를 끄면 결과가 사라집니다. 최소 1 개는 켭니다.
- Disabling all checkboxes returns nothing — keep at least one.
- score 가 낮은 결과(< 0.3)는 무관할 가능성이 높습니다. 0.5+ 만 신뢰.
- Scores below 0.3 are usually noise — trust 0.5+ first.
- 한국어·영어 동일 모델 — 둘 중 어떤 언어로 검색해도 작동.
- Same model handles Korean and English — query in either.
원인·해결: BGE-small (~120MB) 모델 미다운로드 또는 메시지 인덱싱 진행 중. 첫 회상 시 자동 다운로드되며, 방화벽 환경은 xgram model fetch --offline-tarball ./bge-small.tar.gz.
Cause / fix: BGE-small (~120MB) not yet downloaded, or messages still indexing. Auto-downloads on first recall; behind a firewall use xgram model fetch --offline-tarball ./bge-small.tar.gz.
원인·해결: sqlite-vec 인덱스 미생성 또는 L0 데이터 폭증. xgram session reindex 로 재구축.
Cause / fix: sqlite-vec index missing or L0 explosion. Rebuild via xgram session reindex.
CLI: xgram session recall <키워드> · xgram session recall --layers L2 <키워드> (--help 로 layer/limit 옵션 확인) · Architecture: /architecture/ #memory
CLI: xgram session recall <keyword> · xgram session recall --layers L2 <keyword> (run --help for layer/limit flags) · Architecture: /architecture/ #memory
3. Vault — 자격증명 승인 + 30초 Reveal
3. Vault — credential approval + 30s reveal
A · OverviewVault 탭은 OpenXgram 의 보안 핵심 — 다른 에이전트가 요청한 자격증명(API key, 토큰)을 사람이 직접 승인/거부하고, 필요할 땐 30 초 reveal 로 평문을 일시적으로 보여줍니다. 30 초가 지나면 자동 마스킹, 클립보드도 자동 클리어, 메모리는 zeroize. "AI 가 임의로 자격증명을 쓰면 어쩌지" 라는 불안을 policy + UI 두 층에서 해소합니다. 마스터 권한자, 보안 감사 담당자, 다중 에이전트를 운영하는 사람에게 핵심 도구.
Vault is OpenXgram's security core — humans approve/deny credential requests from other agents, and use a 30s reveal to peek at plaintext. After 30s the field re-masks, the clipboard auto-clears, and memory is zeroized. Solves "what if the AI uses my keys behind my back" with both policy and UI. Essential for the master operator, security auditors, and anyone running multiple agents.
B · Screen elements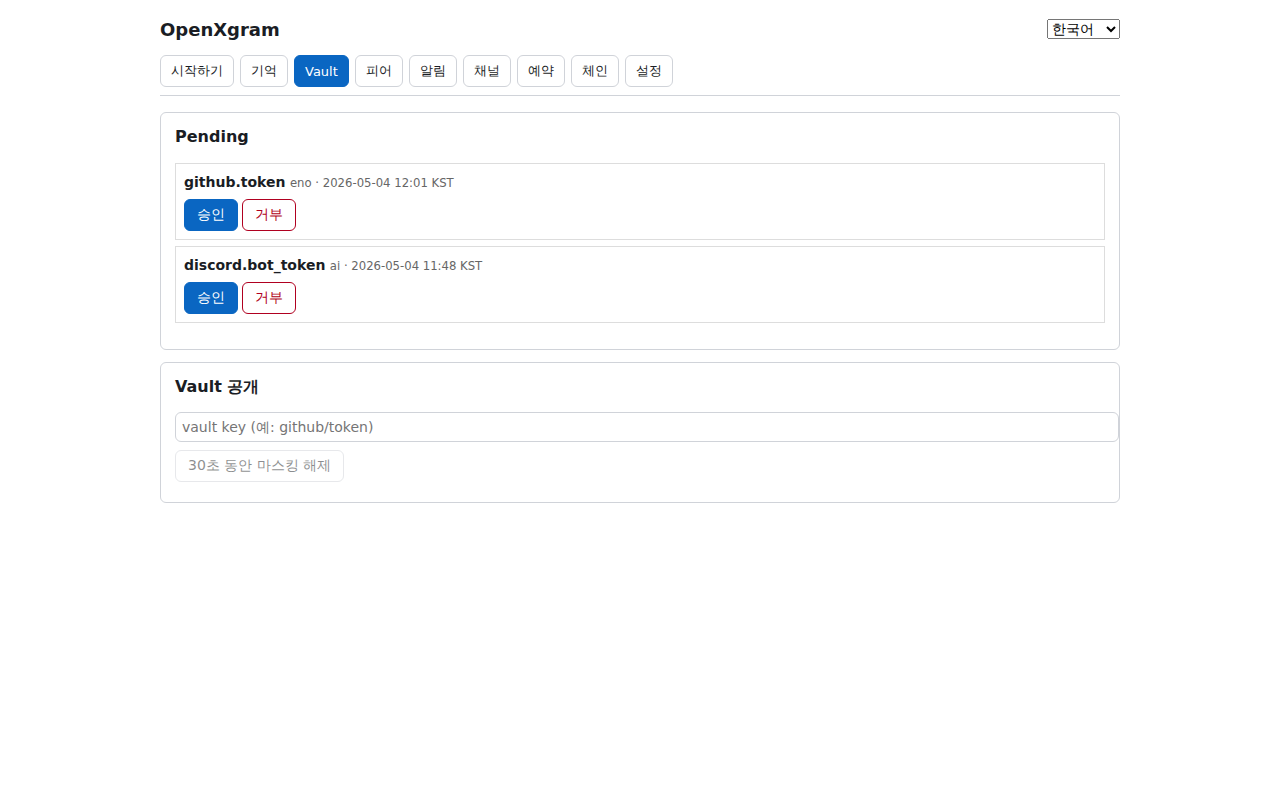
- Pending 카드 헤더 — "승인 대기 자격증명" 라벨. 비어 있으면 "No pending credential approvals" 표시.
- Pending header — "Pending credential approvals". Empty state: "No pending credential approvals".
- Pending 항목 —
key·agent·requested_at. 누가 무엇을 언제 요청했는지. - Pending row —
key·agent·requested_at. Who requested what, and when. - Approve 버튼 — Tauri
ask()다이얼로그로 "Approve <id>?" 재확인. - Approve button — Tauri
ask()dialog with "Approve <id>?" confirmation. - Deny 버튼 — 거부 사유 (현재 "user-denied" 고정, Zod 입력 prompt 추가 예정) 와 함께 invoke.
- Deny button — invoked with reason (currently "user-denied", Zod input prompt incoming).
- Reveal 입력창 — vault key 이름 입력. 예:
OPENAI_API_KEY. - Reveal input — type a vault key name, e.g.
OPENAI_API_KEY. - "30 초 Reveal" 버튼 — 평문 표시 + 카운트다운 시작. 0 초가 되면 마스킹 복구.
- "Reveal for 30s" button — shows plaintext, starts countdown, re-masks at 0.
- "클립보드 복사 (30 초 후 자동 클리어)" 버튼 — 복사 후 30 초 뒤 시스템 클립보드 비움.
- "Copy (auto-clear after 30s)" button — copy + auto-wipe system clipboard after 30s.
각 필드에 어떤 값을 어떻게 입력하는지, 그리고 클릭 순서.
입력 예시
- Pending 항목 (자동 표시) — 다른 에이전트가 요청한 vault 접근. 직접 입력 X — 목록만 봄
- Reveal key 입력창 —
github/token·discord/webhook·openai/api_key(계층형 키, 슬래시 구분)
잘못된 예:githubtoken(구분 없음, 비추천) ·../etc(디렉토리 traversal X)
클릭 순서
- Pending 목록에서 항목 우측의 "승인" 또는 "거부" 클릭
- Reveal 영역에 key 입력 (예:
github/token) - "30초 공개" 클릭 → 값이 30초만 화면에 표시됨
- "30초 후 자동 클리어로 복사" 클릭 → 클립보드에 복사 + 30초 후 자동 비움
Exact values per field, plus click order.
Field examples
- Pending list (auto-shown) — Access requests from other agents. Read-only — no input
- Reveal key input —
github/token·discord/webhook·openai/api_key(hierarchical, slash separated)
Wrong:githubtoken(no separator, discouraged) ·../etc(no traversal)
Click order
- Click "Approve" or "Deny" on a Pending row
- Enter key in Reveal box (e.g.
github/token) - Click "Reveal 30s" → shows value for 30s only
- Click "Copy (auto-clear in 30s)" → puts in clipboard, wipes after 30s
- 다른 에이전트가
OPENAI_API_KEY를 요청 → Pending 목록에 등장. - Another agent asks for
OPENAI_API_KEY→ it appears in Pending. - 요청자(agent) · 시각 확인 후 "Approve" 클릭.
- Verify requester & timestamp, click "Approve".
- 다이얼로그 "Approve <id>?" 에서 OK.
- Confirm in the "Approve <id>?" dialog.
- Reveal 입력창에
STRIPE_SECRET입력. - Type
STRIPE_SECRETin Reveal input. - "30 초 Reveal" 클릭 → 평문 표시 + 카운트다운.
- Click "Reveal for 30s" → plaintext + countdown.
- (선택) "클립보드 복사" 클릭 → 다른 앱에 paste.
- (Optional) "Copy" → paste into another app.
- 알려지지 않은 agent 가
SEED_PHRASE같은 핵심 키 요청. - An unknown agent asks for a core key like
SEED_PHRASE. - Deny 클릭. 사유 자동 기록.
- Click Deny — reason auto-logged.
- Peers 탭에서 그 agent 신원 확인, 의심되면 제거.
- Cross-check the agent in Peers; remove if untrusted.
- 30 초 reveal 은 의도적 — 더 길게 보고 싶다면 다시 누르세요. 영구 평문 노출은 정책상 차단.
- The 30s reveal is intentional — re-press for another 30s. Permanent plaintext is policy-blocked.
- 승인 다이얼로그에서 fingerprint 가 알고 있는 에이전트 것과 일치하는지 반드시 확인.
- Verify the fingerprint in the approval dialog matches the agent you trust.
- 화면 녹화·공유 중에는 reveal 금지. Esc 로 즉시 마스킹 복귀 (예정).
- Don't reveal during screen-record/share. Esc-to-mask is on the roadmap.
- 거부 사유는 추후 prompt 입력으로 확장 — 현재 "user-denied" 고정 (TODO 코멘트).
- Deny reason is hard-coded "user-denied" today — Zod prompt input planned (see TODO).
원인·해결: 정상 (요청이 없는 상태) 또는 ACL 정책이 이미 자동 승인. xgram vault policy show <key> 로 policy 확인.
Cause / fix: usually expected (no requests), or ACL auto-approves. Check via xgram vault policy show <key>.
원인·해결: 키 이름 오타 또는 vault 미저장. xgram vault list 로 사용 가능한 키 확인.
Cause / fix: typo or key not stored. List available keys via xgram vault list.
CLI: xgram vault pending-list · xgram vault approve <id> · xgram vault deny <id> --reason '…' · xgram vault reveal <key> --ttl 30 · xgram vault list
CLI: xgram vault pending-list · xgram vault approve <id> · xgram vault deny <id> --reason '…' · xgram vault reveal <key> --ttl 30 · xgram vault list
4. 피어 — 다른 머신·에이전트 등록
4. Peers — register other machines / agents
A · Overview
Peers 탭은 다른 머신·에이전트의 신원(public key) 을 등록하고 fingerprint 로 검증하는 곳입니다.
등록된 피어는 ACL 화이트리스트, 메시지 라우팅(nostr://·http://), schedule target 으로 활용.
fingerprint 다이얼로그가 추가 시 무조건 떠서 다른 채널(전화·종이) 로 일치 여부 확인을 강제합니다 — MITM 차단의 1 차 방어선.
여러 머신·에이전트로 시스템을 확장하는 단계의 사용자에게 핵심.
Peers registers the identity (public key) of other machines/agents and verifies via fingerprint.
Registered peers serve as ACL whitelist, message-routing destinations (nostr://·http://), and schedule targets.
The fingerprint dialog always pops on add, forcing out-of-band verification (phone, paper) — first-line MITM defense.
Critical when scaling beyond a single machine/agent.
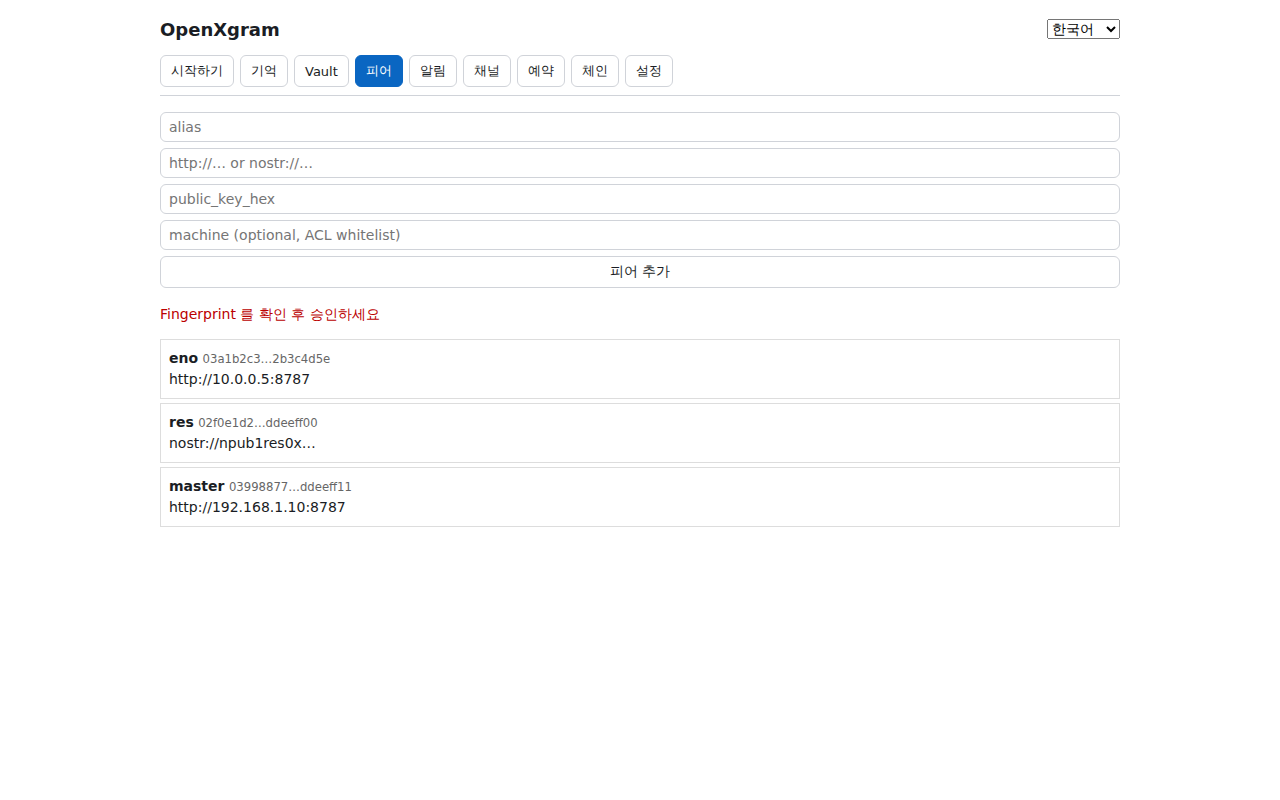
- alias 입력 — 사람이 부르는 이름. 예:
eno,master-laptop. - alias input — human-readable name, e.g.
eno,master-laptop. - address 입력 —
http://host:port또는nostr://relay/pubkey. - address input —
http://host:portornostr://relay/pubkey. - public key (hex) 입력 —
0xprefix 자동 처리. 빈 값이면 "추가" 비활성. - public key (hex) input —
0xprefix accepted. Empty disables "Add". - machine 입력 (선택) — ACL 화이트리스트 키. 비워두면 alias 가 키.
- machine input (optional) — ACL whitelist key. Empty falls back to alias.
- "피어 추가" 버튼 — 클릭 시 fingerprint 다이얼로그 자동 표시 (kind: warning).
- "Add Peer" button — opens fingerprint dialog (kind: warning).
- fingerprint 다이얼로그 — pubkey hex 의 first8…last8 형식으로 표시. 다른 채널 검증 후 confirm.
- Fingerprint dialog — shows first8…last8 of pubkey hex. Verify out-of-band, then confirm.
- 피어 목록 — alias · address · pubkey 일부 · last_seen. 신원 추적용.
- Peer list — alias · address · pubkey snippet · last_seen.
각 필드에 어떤 값을 어떻게 입력하는지, 그리고 클릭 순서.
입력 예시
- alias —
home-server·work-mac·phone(대시 OK, 공백 X, 1~32자)
잘못된 예:My Server(공백) - address —
http://192.168.1.10:7300또는nostr://relay.example.com(URL 형식 필수)
잘못된 예:192.168.1.10(스킴 누락) ·my server(공백) - public_key_hex —
0x+ 64자 hex (총 66자) — 예:0x020000...0001
잘못된 예:020000...(0x 누락) · 길이 부족 - machine (옵션) — ACL 화이트리스트용 머신 식별자. 비워둬도 됨. 예:
home-mac
잘못된 예: 공백 자체는 OK (생략 의미)
클릭 순서
- ① alias 입력 → ② address 입력 → ③ public_key_hex 입력 → (④ machine — 비워도 됨)
- ⑤ "Add Peer" 클릭
- ⑥ fingerprint 다이얼로그가 뜨면 상대 머신의 지문과 대조 후 "예"
- ⑦ 목록 갱신 — 새 peer 가 표시됨
Exact values per field, plus click order.
Field examples
- alias —
home-server·work-mac·phone(dashes OK, no spaces, 1~32 chars)
Wrong:My Server(space) - address —
http://192.168.1.10:7300ornostr://relay.example.com(URL form required)
Wrong:192.168.1.10(missing scheme) ·my server(space) - public_key_hex —
0x+ 64 hex chars (66 total) — e.g.0x020000...0001
Wrong:020000...(no 0x prefix) · wrong length - machine (optional) — Machine ID for ACL whitelist. May leave blank. e.g.
home-mac
Wrong: Empty itself is fine (meaning omit)
Click order
- ① alias → ② address → ③ public_key_hex → (④ machine — optional)
- ⑤ Click "Add Peer"
- ⑥ When fingerprint dialog opens, compare with the other machine's fingerprint, then "Yes"
- ⑦ List refreshes — new peer appears
- 새 노트북에서
xgram peer self로 pubkey 출력. - On the laptop run
xgram peer selfto print pubkey. - 마스터 머신 GUI 의 Peers 탭에 alias =
laptop, address, pubkey 입력. - On master GUI's Peers, fill alias =
laptop, address, pubkey. - "피어 추가" → fingerprint 표시 → 노트북에 음성으로 fingerprint 읽어 확인 → confirm.
- "Add Peer" → fingerprint shown → read it aloud over phone → confirm.
- alias =
eno, address =nostr://relay.example/pubkey. - alias =
eno, address =nostr://relay.example/pubkey. - machine 비워둠 (역할명만 사용).
- Leave machine blank (role-only).
- fingerprint 다이얼로그에서 에이전트 운영자에게 일치 확인.
- Verify fingerprint with the agent operator.
eno 가 라우팅 가능, Vault ACL 도 적용.
Expected — Schedule with target eno routes correctly, Vault ACL applies.
- 피어 목록에서 last_seen 이 갑자기 다른 IP 로 바뀐 항목 발견.
- Spot a peer whose last_seen jumped to a different IP.
- 전화로 fingerprint 재확인.
- Re-verify fingerprint over phone.
- 의심 시
xgram peer remove <alias>후 재등록. - If unsure,
xgram peer remove <alias>then re-add.
- fingerprint 는 코드에서 hex prefix:suffix 단순 표시 (8 + 8 hex = 16 chars). 향후 SHA256 first-8-bytes 로 강화 예정.
- Fingerprint today = simple hex prefix:suffix (8+8 hex). SHA256 first-8-bytes upgrade planned.
- 같은 사람의 여러 머신은 alias 에 머신명을 붙여 구분 (
master-laptop,master-server). - Distinguish a person's machines by suffixing alias (
master-laptop,master-server). - address 에
nostr://사용 시 Nostr 자체 호스팅 릴레이 권장. - For
nostr://consider self-hosted Nostr relays.
원인·해결: alias·address·pubkey 중 하나라도 비어 있으면 버튼이 클릭되지 않음. 세 필드 모두 입력 확인.
Cause / fix: button disabled if alias/address/pubkey is blank. Fill all three.
원인·해결: 양쪽 데몬이 서로 도달 가능해야 함. 방화벽·Tailscale·NAT 점검. xgram peer ping <alias>.
Cause / fix: both daemons need reachability. Check firewall/Tailscale/NAT. xgram peer ping <alias>.
CLI: xgram peer add --alias eno --address http://… --pubkey 0x… · xgram peer list · xgram peer remove <alias> · xgram peer self · xgram peer ping <alias>
CLI: xgram peer add --alias eno --address http://… --pubkey 0x… · xgram peer list · xgram peer remove <alias> · xgram peer self · xgram peer ping <alias>
5. 알림 — Discord / Telegram 봇 마법사
5. Notify — Discord / Telegram bot wizard
A · Overview
Notify 탭은 BotFather/Discord developer 에서 받은 토큰을 OpenXgram 에 연결하는 마법사입니다.
토큰 검증(notify_telegram_validate) → chat_id 자동 감지(notify_telegram_detect_chat) → 저장 + 테스트 메시지를 한 화면에서 끝냅니다.
상단 상태 카드가 telegram_configured·discord_configured·discord_webhook_configured 3 가지 플래그를 표시.
"내 폰으로 OpenXgram 알림 받기" 가 목적인 모든 사용자에게 첫걸음. CLI 보다 GUI 가 압도적으로 빠른 분야.
Notify is the wizard that connects BotFather/Discord-developer tokens to OpenXgram.
One screen handles token validate (notify_telegram_validate) → chat_id auto-detect (notify_telegram_detect_chat) → save + test message.
A top status card shows three flags: telegram_configured·discord_configured·discord_webhook_configured.
The first stop for anyone who wants OpenXgram alerts on their phone — and where the GUI massively beats the CLI.

- 상태 카드 — Telegram·Discord·Discord-Webhook 3 가지 configured 플래그 (연결됨/미설정).
- Status card — three configured flags (configured/not set) for Telegram/Discord/Discord-Webhook.
- Telegram 토큰 입력 — BotFather 의
123456:ABC…형식. - Telegram token input — BotFather format
123456:ABC…. - "토큰 검증" 버튼 —
notify_telegram_validateinvoke. 성공 시 bot_username 표시. - "Validate" button — invokes
notify_telegram_validate; on success shows bot_username. - chat_id 입력 / 자동감지 버튼 — 봇에
/start보낸 뒤 누르면 chat_id 채워짐. - chat_id input / auto-detect button — fills chat_id after you message
/startto the bot. - "저장 + 테스트 전송" 버튼 —
notify_telegram_save_and_test호출. 성공 시 봇이 "OpenXgram GUI 연결 성공 ✓" 수신. - "Save + send test" button — calls
notify_telegram_save_and_test; bot receives "OpenXgram GUI connected ✓". - Discord 섹션 — Bot Token / Channel ID 또는 Webhook URL 두 옵션 (둘 중 하나 선택).
- Discord section — Bot Token / Channel ID, or Webhook URL (pick one).
- 에러·busy 표시 — 검증·감지·저장 중 spinner + 실패 시 에러 메시지.
- Error / busy indicator — spinner during validate/detect/save, error string on failure.
- 저장 시각 (savedAt) — 마지막 저장 KST 시각 표시.
- Saved-at (savedAt) — last save in KST.
각 필드에 어떤 값을 어떻게 입력하는지, 그리고 클릭 순서.
입력 예시
- Telegram 봇 토큰 —
1234567890:ABCdefGhIjKlMnOpQrStUvWxYz형식 (BotFather 가 발급한 그대로 붙여넣기)
잘못된 예:ABCdef(콜론 없음) · 빈 문자열 - Telegram chat_id — 본인 텔레그램 chat_id —
123456789같은 9~10자리 숫자만
잘못된 예:@username(사용자명 X) ·123-456(대시 X) - Discord 봇 토큰 —
MTI…(long string)Discord 개발자 포털 → Bot 탭 → Reset Token 으로 받은 그대로
잘못된 예: Webhook URL 을 토큰으로 잘못 입력 X - Discord channel_id (옵션) —
123456789012345678같은 17~20자리 숫자 (개발자 모드 켜고 채널 우클릭 → ID 복사)
잘못된 예: 채널 이름 자체 X (반드시 숫자 ID) - Discord webhook URL (옵션) —
https://discord.com/api/webhooks/{id}/{token}전체 URL
잘못된 예: 토큰만 X · /api/webhooks/ 부분 누락 X
클릭 순서
- Telegram: ① 토큰 입력 → ② "검증" 클릭 → ✓ bot @… 표시되면 ③ 봇에 /start 메시지 보내기 → ④ "chat_id 자동 감지" 클릭 → ⑤ "저장 + 테스트" 클릭 → 휴대폰 알림 확인
- Discord: ① 토큰 입력 → ② "검증" 클릭 → ③ channel_id 또는 webhook URL 입력 → ④ "저장" 클릭 → 채널에 테스트 메시지 도착 확인
Exact values per field, plus click order.
Field examples
- Telegram bot token —
1234567890:ABCdefGhIjKlMnOpQrStUvWxYz(paste exactly what BotFather gave you)
Wrong:ABCdef(no colon) · empty - Telegram chat_id — Your chat_id — 9~10 digits like
123456789
Wrong:@username(handle, not allowed) ·123-456(no dashes) - Discord bot token —
MTI…(long string)from Discord Dev Portal → Bot tab → Reset Token
Wrong: Don't paste a webhook URL here - Discord channel_id (optional) — 17~20 digit number (right-click channel with Developer Mode on → Copy ID)
Wrong: Not the channel name (must be numeric ID) - Discord webhook URL (optional) — Full URL:
https://discord.com/api/webhooks/{id}/{token}
Wrong: Not just the token · don't omit /api/webhooks/
Click order
- Telegram: ① token → ② Validate → ✓ bot @… → ③ send /start to your bot → ④ Detect chat_id → ⑤ Save + Test → check phone
- Discord: ① token → ② Validate → ③ channel_id or webhook URL → ④ Save → confirm test message in channel
- Telegram 에서 @BotFather 에
/newbot→ 토큰 받기. - In Telegram message @BotFather
/newbot→ grab the token. - GUI Notify 탭에 토큰 붙여넣기 → "토큰 검증".
- Paste into Notify → "Validate".
- 휴대폰에서 새 봇에게
/start. - From your phone,
/startthe new bot. - "내 chat_id 자동 감지" 클릭 → 자동 채움 → "저장 + 테스트 전송".
- "Auto-detect chat_id" → auto-fills → "Save + send test".
- Discord 채널 → "통합" → "웹훅" → 새 웹훅 URL 복사.
- In Discord channel → Integrations → Webhooks → copy URL.
- GUI 의 Discord webhook URL 칸에 붙여넣기 → "저장 + 테스트".
- Paste in Discord webhook input → "Save + send test".
discord_webhook_configured 만 켜짐 (Bot 토큰은 별개).
Expected — test post in channel. Only discord_webhook_configured flips on.
- BotFather 에서
/revoke→ 새 토큰 발급. - BotFather
/revoke→ new token. - GUI 에서 새 토큰으로 다시 검증·저장. chat_id 는 그대로 사용.
- Re-validate & save in GUI; chat_id stays the same.
- 토큰은 vault 에 저장 — 평문 파일·env 변수에 두지 마세요.
- Tokens go to the vault — no plaintext files / env vars.
- chat_id 자동 감지가 실패하면 봇에
/start를 다시 보내면 보통 해결됩니다. - If auto-detect fails, message the bot
/startagain — usually works. - 여러 사람이 같은 채널을 쓰려면 group chat 으로 만들고 group chat_id 를 사용.
- For multi-user, create a group chat and use the group's chat_id.
- 저장 후 Channel 탭에서 어댑터 상태가 연결됨 으로 갱신되었는지 한 번 더 확인.
- After save, double-check the adapter status in Channel turned configured.
원인·해결: 봇 update queue 에 메시지가 없음. 폰에서 봇 채팅 열고 /start 또는 아무 텍스트 보낸 뒤 다시 "자동 감지".
Cause / fix: empty bot update queue. Send /start or any text to the bot, then retry "Auto-detect".
원인·해결: 잘못된 토큰 또는 outbound 차단. Telegram https://api.telegram.org, Discord https://discord.com/api 허용 필요.
Cause / fix: bad token or blocked egress. Allow Telegram https://api.telegram.org, Discord https://discord.com/api.
CLI: xgram notify setup-telegram --token … --chat-id … · xgram notify setup-discord --webhook … · xgram notify status · xgram notify test --platform telegram
CLI: xgram notify setup-telegram --token … --chat-id … · xgram notify setup-discord --webhook … · xgram notify status · xgram notify test --platform telegram
6. 채널 — 다중 에이전트 허브 라이브
6. Channel — live multi-agent hub
A · Overview
Channel 탭은 OpenXgram 의 실시간 운영 대시보드입니다. channel_status + channel_recent_messages
두 invoke 를 동시 호출해, 어댑터(Telegram·Discord 등) configured 상태 / 등록 피어 수 / 예약 대기 수 / 최근 메시지 20 건을 한 화면에 표시.
타임스탬프는 KST 그대로 (데몬이 KST epoch 으로 저장 → 화면에서 그대로 포맷). 자동 폴링 없음 — "새로고침" 으로 수동 refetch.
여러 에이전트가 동시에 활동하는 환경에서 "지금 무엇이 흐르고 있나" 를 1 분 안에 파악하고 싶을 때 사용.
Channel is OpenXgram's live ops dashboard. Two parallel invokes (channel_status + channel_recent_messages)
paint adapter configured-state / peer count / pending schedules / last 20 messages on one screen.
Timestamps display in KST (daemon stores KST epoch; UI formats as-is). No auto-polling — Refresh is manual.
Use when running several agents and you need a 1-minute "what's flowing right now".

- 제목 + 새로고침 버튼 — 클릭 시
refetchStatus()+refetchRecent()동시 실행. - Title + Refresh button — runs
refetchStatus()+refetchRecent()together. - 어댑터 카드 — platform · configured 배지 · note (예: webhook URL 미설정 사유).
- Adapter card — platform · configured badge · note (e.g. why webhook is missing).
- "피어 수" 카드 —
peer_count. 0 이면 Peers 탭에서 추가 안내. - "Peers" card —
peer_count. 0 directs you to Peers tab. - "예약 대기" 카드 —
schedule_pending. Schedule 탭의 status=pending 합계. - "Schedule pending" card —
schedule_pending= pending count from Schedule tab. - 최근 메시지 20 건 리스트 — source · summary · timestamp_kst (yyyy-mm-dd hh:mm KST 포맷).
- Recent 20 messages — source · summary · timestamp_kst (yyyy-mm-dd hh:mm KST).
- 빈 상태 메시지 — 메시지 0 건이면 "No recent messages".
- Empty state — "No recent messages" when count = 0.
각 필드에 어떤 값을 어떻게 입력하는지, 그리고 클릭 순서.
입력 예시
- Refresh 버튼 — 수동 새로고침. 입력 없음 — 클릭만
- (상태 카드들) — 어댑터 / Peer / 예약 / 최근 메시지가 자동 표시. 직접 입력 X
클릭 순서
- 터미널에서
xgram channel serve --bind 127.0.0.1:7250실행 (서버 기동) - GUI 의 Channel 탭이 자동으로 상태 폴링 (5초 주기)
- 어댑터 카드 — Discord/Telegram 등 등록된 플랫폼이 "connected" 인지 확인
- Peer 카드 — 등록된 역할 (master/eno/kai…) 목록
- 최근 메시지 카드 — 들어온/보낸 메시지 stream
Exact values per field, plus click order.
Field examples
- Refresh button — Manual refresh. No input — just click
- (Status cards) — Adapters / peers / scheduled / recent auto-shown. Read-only
Click order
- Run
xgram channel serve --bind 127.0.0.1:7250in a terminal - Channel tab polls status automatically (5s interval)
- Adapters card — confirms Discord/Telegram etc. "connected"
- Peers card — registered roles (master/eno/kai…)
- Recent messages — stream of inbound/outbound
- GUI 열고 Channel 탭 클릭.
- Open GUI → Channel tab.
- "새로고침" 클릭 → 모든 어댑터 연결됨 확인.
- "Refresh" → all adapters configured.
- 예약 대기 = 0 이면 cron schedule 누락 의심 — Schedule 탭으로 점프.
- Schedule pending = 0 may mean missing cron — jump to Schedule.
- 최근 메시지 20 건의 source 컬럼 스캔.
- Scan the source column of the last 20.
- 특정 source 가 반복 등장하면 그쪽 워크로드 집중.
- Repeated source → that agent is loaded.
- 특정 platform 이 미설정. note 에 사유 표시.
- Some platform is not set; note field shows why.
- Notify 탭으로 가서 마법사로 등록.
- Switch to Notify tab and run the wizard.
- Channel 탭으로 돌아와 새로고침.
- Back to Channel and refresh.
- 자동 폴링 없음 — 30 초마다 새로고침이 필요하다면 외부 스크립트로
xgram channel status폴링. - No auto-poll — for 30s polling use an external script with
xgram channel status. - timestamp_kst 가 0 이면 "-" 로 표시 (코드
formatKstEpoch). formatKstEpochdisplays "-" when timestamp_kst is 0.- limit 은 코드에서 20 으로 고정 — 더 보려면
xgram channel recent --limit 100사용. - Limit is hard-wired to 20 — use
xgram channel recent --limit 100for more.
원인·해결: 수동 refresh 만 동작. "새로고침" 클릭 또는 다른 탭 갔다 돌아오기.
Cause / fix: refresh is manual — click Refresh or revisit the tab.
원인·해결: 다른 머신에서 이미 등록된 어댑터를 통해 데이터 동기화. 현재 머신만 미설정 상태일 수 있음.
Cause / fix: data is syncing from another machine where the adapter is configured. Current machine alone may be unset.
CLI: xgram channel status · xgram channel recent --limit 20 · xgram channel recent --since 1h --platform telegram
CLI: xgram channel status · xgram channel recent --limit 20 · xgram channel recent --since 1h --platform telegram
7. 예약 — once / cron 메시지
7. Schedule — once / cron messages
A · Overview
Schedule 탭은 메시지·작업을 한 번(once) 또는 반복(cron) 으로 예약합니다. target_kind 는 role(에이전트 역할명) 또는 platform(예: discord:1234),
schedule_kind 는 once(ISO datetime) 또는 cron(KST 표현). 통계 카드(pending/sent/failed/cancelled) 와 목록이 동일 화면에 표시되며,
각 row 의 status·next_due_at_kst·last_error 로 상태 추적. 모든 시각은 KST — 서버 TZ 가 UTC 여도 데몬이 KST 로 해석합니다.
아침 브리핑·일일 보고·정기 백업 트리거에 적합.
Schedule queues messages/jobs as once or cron. target_kind = role (agent role) or platform (e.g. discord:1234);
schedule_kind = once (ISO datetime) or cron (KST expression). Stats (pending/sent/failed/cancelled) and the list share one screen, with per-row status·next_due_at_kst·last_error.
Times are KST — even on UTC servers the daemon interprets KST.
Great for morning briefings, daily reports, recurring backup triggers.
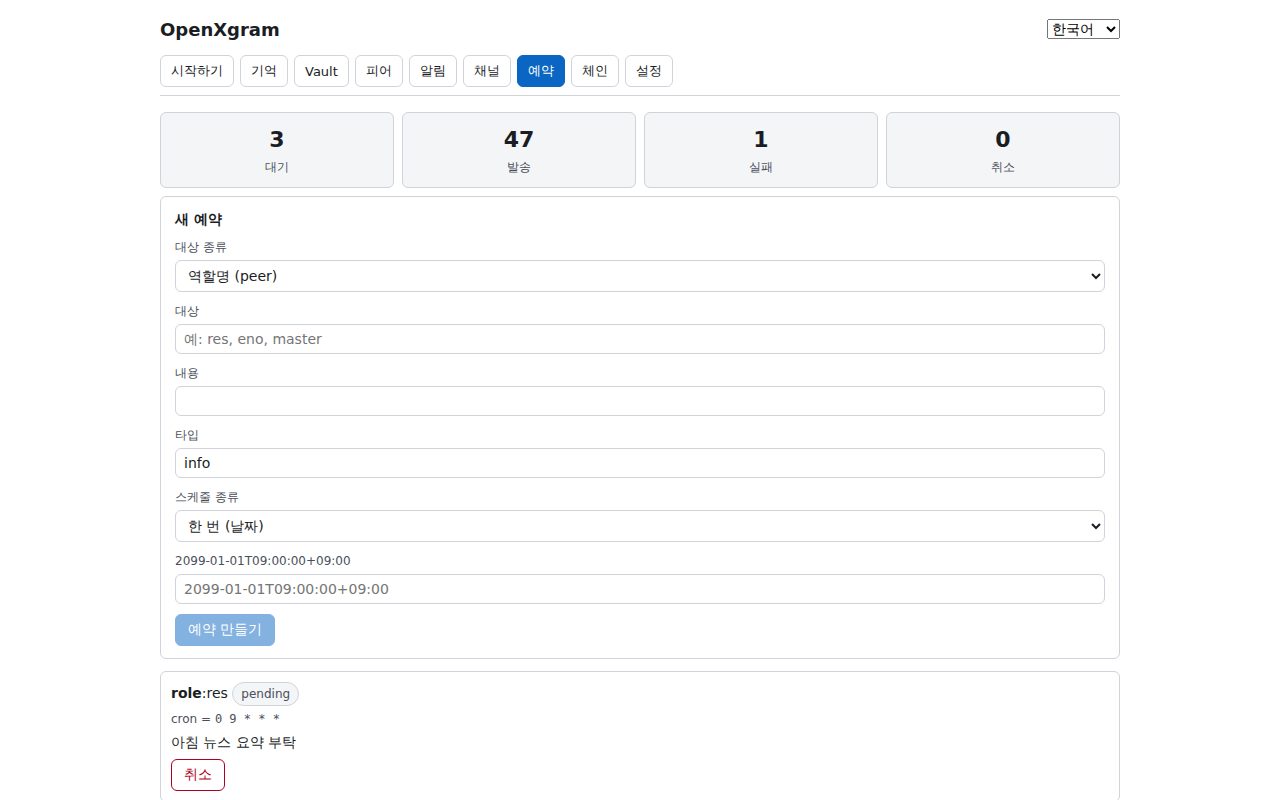
- target_kind 셀렉트 —
role또는platform. - target_kind select —
roleorplatform. - target 입력 — 예:
res(role) 또는discord:1234567890. - target input — e.g.
res(role) ordiscord:1234567890. - payload 입력 (textarea) — 보낼 메시지 본문 (multiline).
- payload textarea — message body (multiline).
- msg_type 셀렉트 —
info·request·result·alert. - msg_type select —
info·request·result·alert. - schedule_kind 셀렉트 —
once또는cron. 선택에 따라 placeholder 동적 변경. - schedule_kind select —
onceorcron; placeholder updates accordingly. - schedule_value 입력 — once 면
2026-05-01T09:00+09:00, cron 이면0 9 * * *. - schedule_value input — once =
2026-05-01T09:00+09:00, cron =0 9 * * *. - "예약 만들기" 버튼 — target/payload/value 가 모두 채워져야 활성. invoke
schedule_create. - "Create schedule" button — disabled until target/payload/value all set. Invokes
schedule_create. - 통계 카드 4 개 — pending / sent / failed / cancelled.
- Stats grid (4) — pending / sent / failed / cancelled.
- 예약 목록 — id · target · schedule · status · next_due_at_kst · last_error · cancel 버튼.
- Schedule list — id · target · schedule · status · next_due_at_kst · last_error · cancel button.
각 필드에 어떤 값을 어떻게 입력하는지, 그리고 클릭 순서.
입력 예시
- target_kind 선택 —
role(역할명으로 라우팅) 또는platform(플랫폼 직접) - target — role 일 때:
master,eno,res,kai중 하나
platform 일 때:discord:123456789012345678형식
잘못된 예: 공백 · 정의되지 않은 role 명 - payload — 전송할 메시지 본문 — 자유 텍스트, 줄바꿈 OK
잘못된 예: 비어있으면 전송 X - schedule_kind 선택 —
once(1회) 또는cron(반복) - schedule_value — once:
2026-05-06T09:00:00+09:00ISO8601 (KST)
cron:0 9 * * *(5필드, 분 시 일 월 요일)
잘못된 예: once 에 cron 쓰기 X · cron 표현식 오타 (예: 6필드)
클릭 순서
- ① target_kind 선택 → ② target 입력 → ③ payload 입력
- ④ schedule_kind 선택 → ⑤ schedule_value 입력 (예시 그대로 복사 가능)
- ⑥ "Create" 클릭 → ⑦ 목록에 새 항목 + status=pending
- ⑧ 시간 도달 시 자동 발송 → status=sent (취소하려면 ⑨ "Cancel" 클릭)
Exact values per field, plus click order.
Field examples
- target_kind —
role(route by role) orplatform(direct) - target — role: one of
master/eno/res/kai
platform:discord:123456789012345678
Wrong: blank · undefined role - payload — Message body — free text, newlines OK
Wrong: Empty = nothing sent - schedule_kind —
onceorcron - schedule_value — once: ISO8601 like
2026-05-06T09:00:00+09:00
cron:0 9 * * *(5 fields)
Wrong: Mixing once-format with cron · 6-field cron
Click order
- ① target_kind → ② target → ③ payload
- ④ schedule_kind → ⑤ schedule_value
- ⑥ Create → ⑦ row appears with status=pending
- ⑧ When due, auto-fires → status=sent (or click ⑨ Cancel)
- target_kind = role, target =
res. - target_kind = role, target =
res. - payload = "오늘의 핵심 뉴스 5 줄 요약".
- payload = "Top 5 news of today".
- schedule_kind = cron, value =
0 9 * * *. - schedule_kind = cron, value =
0 9 * * *. - "예약 만들기" → 통계 pending +1.
- "Create schedule" → pending +1.
- schedule_kind = once.
- schedule_kind = once.
- value =
2026-12-25T18:00+09:00. - value =
2026-12-25T18:00+09:00. - "예약 만들기" → 발송 후 status=sent.
- "Create schedule" → after fire, status=sent.
- 목록에서 status=failed 항목의 last_error 확인.
- Inspect last_error of a status=failed row.
- 원인 (예: target alias 오타) 파악 후 cancel.
- Identify cause (e.g. alias typo), then cancel.
- 새 예약을 올바른 target 으로 다시 등록.
- Recreate with correct target.
- cron 표현은 KST 기준. UTC 서버에서도 그대로 KST 시각으로 입력.
- Cron is interpreted in KST regardless of server TZ.
- "예약 만들기" 버튼은 target·payload·value 셋 모두 trim 후 비어있지 않아야 활성.
- The Create button activates only when target/payload/value are all non-empty after trim.
- cron 변경은 cancel + 새로 만들기 — 코드에 in-place 편집은 없음.
- To change a cron: cancel and recreate (no in-place edit).
- 한 번에 다량 예약은 CLI 의 batch JSON 입력이 효율적.
- Bulk loads are easier via the CLI's batch JSON input.
원인·해결: 서버 TZ 가 UTC 라 cron 을 UTC 로 입력함. KST 그대로 입력하면 데몬이 자동 KST 해석.
Cause / fix: you typed UTC because server is UTC. Always type KST — daemon evaluates KST.
원인·해결: target alias 가 Peers 에 등록되어 있지 않음. Peers 탭에서 추가 후 cancel + 재등록.
Cause / fix: target alias missing in Peers. Add it, then cancel + recreate.
CLI: xgram schedule add --target res --kind cron --value '0 9 * * *' --payload '오늘 브리핑' · xgram schedule list · xgram schedule cancel <id> · xgram schedule stats
CLI: xgram schedule add --target res --kind cron --value '0 9 * * *' --payload 'morning briefing' · xgram schedule list · xgram schedule cancel <id> · xgram schedule stats
8. 체인 — YAML 워크플로우
8. Chain — YAML workflows
A · Overview
Chain 탭은 여러 단계를 YAML 한 덩어리로 정의해 dry-run·실행하는 워크플로우 도구입니다.
chain_create_yaml·chain_run·chain_delete 세 invoke 로 작동하며, 실행 결과는 step 별 step_order · executed · response · error · skipped_reason.
failed 플래그는 어느 step 라도 에러나면 true. "오늘 출근 루틴" "주간 보고 묶음" 같은 다단계 자동화에 적합.
Chain defines multi-step workflows as one YAML doc and runs them with dry-run.
Three invokes: chain_create_yaml·chain_run·chain_delete. Per-step results: step_order · executed · response · error · skipped_reason.
failed = true if any step errored. Best for "morning routine", "weekly report bundle" — anything multi-step.
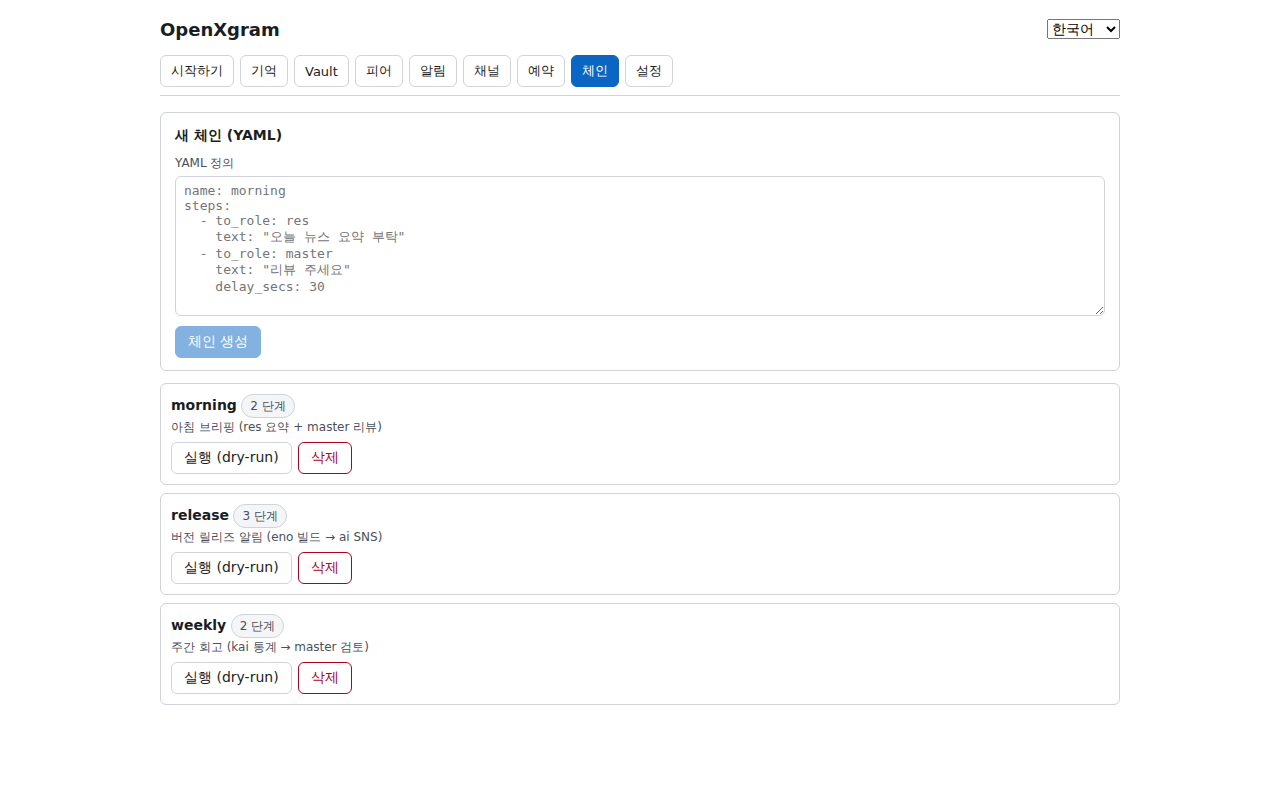
- YAML 입력 textarea — multiline. 예:
name: morning+description:+steps:. - YAML textarea — multiline; e.g.
name: morning+description:+steps:. - "체인 생성" 버튼 — invoke
chain_create_yaml; 성공 시 textarea 비우고 목록 갱신. - "Create chain" button — invokes
chain_create_yaml; clears textarea and refetches list on success. - 에러 표시 — YAML 파싱 실패 시 빨간 텍스트로 사유 노출.
- Error text — red message on YAML parse fail.
- 체인 목록 — id · name · description · enabled · step_count · created_at_kst.
- Chain list — id · name · description · enabled · step_count · created_at_kst.
- "실행 (dry-run)" 버튼 — invoke
chain_run; RunResult 반환. - "Run (dry-run)" button — invokes
chain_run; returns RunResult. - "삭제" 버튼 — confirm 후
chain_delete. - "Delete" button — confirm dialog →
chain_delete. - RunResult 패널 — chain_name · failed · steps[] (step_order · executed · response · error · skipped_reason).
- RunResult panel — chain_name · failed · steps[] (step_order · executed · response · error · skipped_reason).
각 필드에 어떤 값을 어떻게 입력하는지, 그리고 클릭 순서.
입력 예시
- YAML textarea — name + steps 정의. placeholder 의 예제를 복사하면 즉시 작동:
name: morning\nsteps:\n - to_role: res\n text: "오늘 뉴스 요약 부탁"\n - to_role: master\n text: "리뷰 주세요"\n delay_secs: 30
잘못된 예: 들여쓰기 깨진 yaml · steps 누락 · text 누락
클릭 순서
- ① YAML 입력 (또는 placeholder 그대로 복사)
- ② "Create" 클릭 → ③ 목록에 체인 표시
- ④ "Run" 클릭 → 단계별로 순차 실행 (delay_secs 만큼 대기 포함)
- ⑤ RunResult 영역에 단계별 성공/실패 표시
- 삭제하려면 ⑥ "Delete" 클릭
Exact values per field, plus click order.
Field examples
- YAML textarea — Define name + steps. Copy the placeholder example to get started.
Wrong: broken indent · missing steps · missing text
Click order
- ① Enter YAML (or copy the placeholder)
- ② Create → ③ chain appears in list
- ④ Run → executes steps in order (waits delay_secs between)
- ⑤ RunResult shows per-step success/failure
- ⑥ Delete to remove
- YAML:
name: morning· steps = [뉴스 요약, 캘린더 확인, 알림 발송]. - YAML:
name: morning· steps = [news digest, calendar check, send alert]. - "체인 생성" → 목록에 추가.
- "Create chain" → joins the list.
- "실행 (dry-run)" → RunResult 검사.
- "Run (dry-run)" → review RunResult.
- YAML 의 step 에
when:조건 추가. - Add a
when:condition on a step. - 실행 시 조건 미충족 step 은 skipped_reason 채워서 통과.
- On run, unmet step gets skipped_reason and continues.
- RunResult 에서 첫 error 가 발생한 step_order 찾기.
- Find the first step_order with non-null error in RunResult.
- error 메시지로 원인 추정 → YAML 수정 → "체인 생성" 으로 재등록 (기존은 삭제).
- Use error to diagnose → fix YAML → recreate (delete the old one).
- "실행 (dry-run)" 은 부작용 없음 — 부담 없이 여러 번 실행 가능.
- Dry-run has no side effects — re-run as often as you like.
- YAML 큰 파일은 CLI 의
chain create -f file.yaml이 편함. - Large YAML files are easier via
chain create -f file.yaml. - 체인 자체가 disabled 상태면 list 에 표시되지만 실행 안 됨.
- Disabled chains appear in the list but won't run.
- Schedule 탭 cron 의 payload 에
chain:morning형식으로 체인 트리거 가능. - Trigger from Schedule with payload
chain:morning.
원인·해결: 들여쓰기·tab 혼용·콜론 누락. yamllint 또는 외부 에디터로 검증 후 다시 붙여넣기.
Cause / fix: indent/tab mix or missing colon. Validate with yamllint first.
원인·해결: 데몬 자체 에러 (e.g. peer 미해결). xgram daemon logs --tail 확인.
Cause / fix: daemon-level error (e.g. unresolved peer). Inspect xgram daemon logs --tail.
CLI: xgram chain create -f morning.yaml · xgram chain run morning · xgram chain list · xgram chain delete morning
CLI: xgram chain create -f morning.yaml · xgram chain run morning · xgram chain list · xgram chain delete morning
9. 설정 — USDC 일일 한도
9. Settings — USDC daily limit
A · OverviewSettings 탭은 USDC 일일 결제 한도를 보고 변경하는 곳입니다. 내부 단위는 micro-USDC (1 USDC = 1,000,000), UI 는 사용자 친화적인 USDC 단위로 변환. 변경은 MFA 재인증 다이얼로그로 보호 (현재 confirm only, PRD-MFA-02 반영 시 WebAuthn). "에이전트 폭주" 또는 "잘못된 결제 트리거" 의 마지막 안전벨트 — 한도 0 으로 설정하면 모든 결제가 차단됩니다(의도적 kill-switch). 결제 권한을 가진 마스터 사용자에게 핵심 도구.
Settings shows and updates the USDC daily payment cap. Internally micro-USDC (1 USDC = 1,000,000); UI shows USDC for humans. Changes are gated by an MFA re-auth dialog (today: confirm only; once PRD-MFA-02 ships: WebAuthn). Last seatbelt against runaway agents or buggy payment triggers — setting cap to 0 blocks all payments (intentional kill-switch). Critical for any master with payment authority.
B · Screen elements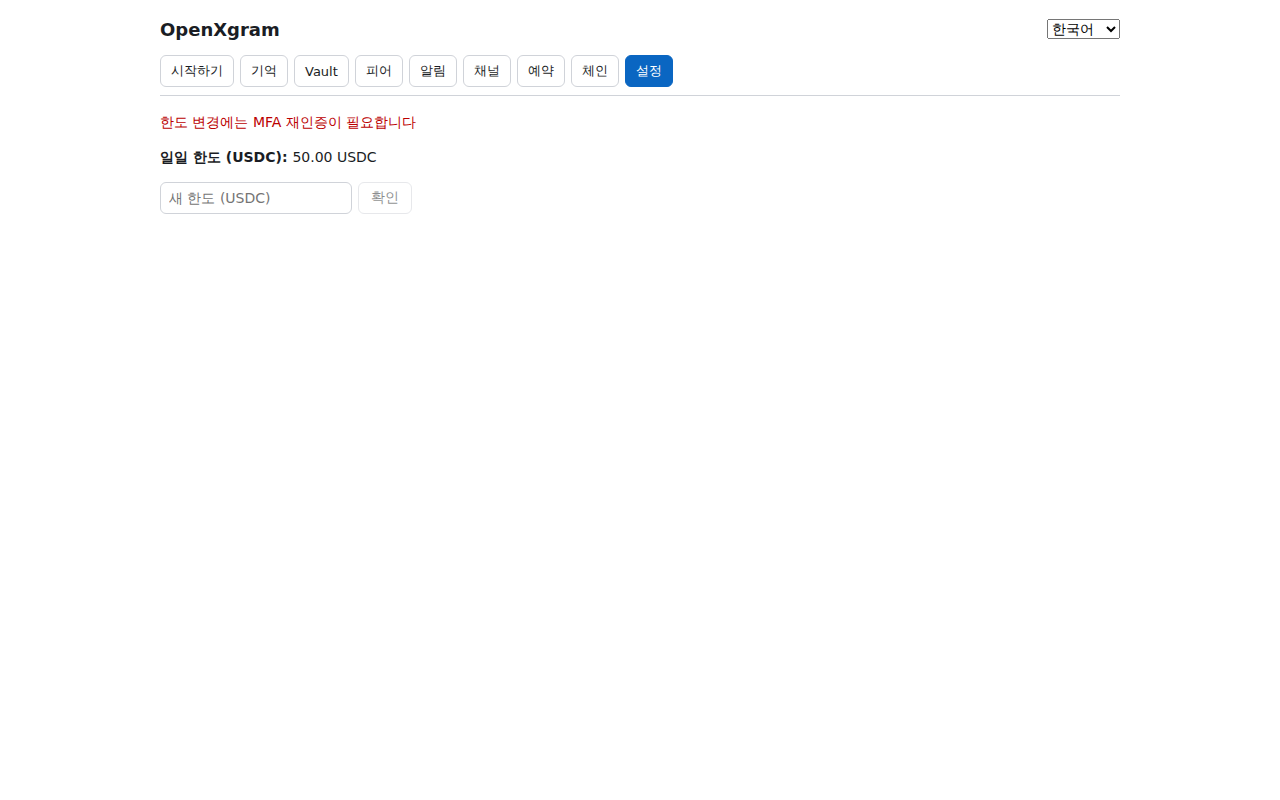
- MFA 안내 라인 — 빨간 텍스트로 "Limit changes require MFA re-authentication".
- MFA notice — red line "Limit changes require MFA re-authentication".
- 현재 한도 표시 — micro-USDC 를 USDC 로 환산해 표시. 로딩 중 "loading…".
- Current cap display — micro-USDC converted to USDC. "loading…" while fetching.
- 새 한도 입력 — 소수점 2 자리 권장 (예:
50.00). 음수·NaN 은 저장 차단. - New cap input — 2 decimals recommended (
50.00). Rejects negative/NaN. - 저장 버튼 — Tauri
ask()"MFA re-authentication required. Continue?" 다이얼로그 → 확인 시 invoke. - Save button — Tauri
ask()"MFA re-authentication required. Continue?" → confirm to invoke. - Zod 스키마 —
daily_limit_usdc_micro: z.number().int().nonnegative()(코드에서 강제). - Zod schema —
daily_limit_usdc_micro: z.number().int().nonnegative()(enforced in code).
각 필드에 어떤 값을 어떻게 입력하는지, 그리고 클릭 순서.
입력 예시
- 일일 한도 입력 — USDC 단위 숫자. 소수점 2자리까지. 예:
100,10.50,0(무제한)
잘못된 예: 음수 X · 문자 X · 통화 기호 X (숫자만)
클릭 순서
- 현재 한도 확인 (자동 표시)
- ① 새 한도 입력 (예:
50.00) - ② "확인" 클릭
- ③ MFA 안내가 뜨면 한 번 더 본인 확인 후 적용
- ④ 적용된 한도 갱신 표시
Exact values per field, plus click order.
Field examples
- daily limit input — USDC number. Up to 2 decimals. e.g.
100,10.50,0(unlimited)
Wrong: no negative · no letters · no currency symbols
Click order
- View current limit (auto-shown)
- ① Enter new limit (e.g.
50.00) - ② Click Save
- ③ MFA prompt — re-authenticate to apply
- ④ Updated limit displays
- 현재 한도가 0 으로 표시 (초기값) 확인.
- Confirm current cap shows 0 (default).
- 새 한도 칸에
50.00입력. - Type
50.00in the new cap input. - 저장 → MFA 다이얼로그 확인.
- Save → confirm MFA dialog.
- 의심스런 결제 활동 발견.
- Spot suspicious payment activity.
- 새 한도에
0입력 → 저장 → MFA 확인. - Enter
0→ Save → confirm MFA.
- 주차별 사용량 검토 후 적정 cap 산정.
- Review weekly usage; pick a fitting cap.
- 새 cap (예: 100.00) 입력 → 저장.
- Enter new cap (e.g. 100.00) → Save.
- UI 는 USDC 단위지만 내부는 micro-USDC —
Math.floor(num * 1_000_000)변환. - UI is USDC; internal is micro-USDC via
Math.floor(num * 1_000_000). - Zod 스키마가 음수·NaN 차단 — invalid 값 입력 시 저장 안 됨 (silently).
- Zod blocks negative/NaN — invalid input silently no-ops.
- 한도 0 은 의도적 kill-switch — 영원히 0 으로 두지 말고 원인 해결 후 복구.
- Cap 0 is the intentional kill-switch — don't leave it forever, restore after triage.
- WebAuthn 통합 후엔 변경 시마다 보안키·생체 요구.
- After WebAuthn lands, every change requires a security key / biometric.
원인·해결: 입력값이 Number.isFinite 실패 또는 음수. 콘솔(F12) 로 invoke 호출 여부 확인.
Cause / fix: input fails Number.isFinite or is negative. Check invoke in devtools (F12).
원인·해결: 일일 누적이 이미 한도 초과. xgram payment usage today 로 확인 후 한도를 더 올리거나 다음 날 대기.
Cause / fix: today's spend already exceeds cap. Check xgram payment usage today; raise cap or wait until tomorrow.
CLI: xgram payment limit get · xgram payment limit set 50.00 · xgram payment usage today
CLI: xgram payment limit get · xgram payment limit set 50.00 · xgram payment usage today
작업별 인터페이스 추천
Pick the surface per task
같은 작업도 인터페이스마다 속도·편의가 다릅니다. 코드를 본 결과 GUI 가 압도적으로 빠른 영역과 CLI 가 압도적으로 빠른 영역이 갈립니다.
Same task, different surface speeds. From the code: GUI dominates a few areas, CLI dominates the rest.
GUI 가 빠른 작업
Where GUI wins
- Notify 봇 마법사 (chat_id 자동 감지 한 클릭)
- Notify wizard (one-click chat_id auto-detect)
- Vault 30 초 reveal + 클립보드 자동 클리어
- Vault 30s reveal + auto-clipboard wipe
- Peers fingerprint 시각 확인
- Peers fingerprint visual check
- Channel 라이브 대시보드
- Channel live dashboard
CLI 가 빠른 작업
Where CLI wins
- 대량 schedule 등록 (배치 JSON 입력)
- Bulk schedule (batch JSON)
- Memory 검색을 grep·jq 로 후처리
- Pipe Memory recall to grep/jq
- Chain YAML 파일 직접 import
- Direct Chain YAML import
- 모든 자동화·CI·AI 하네스 통합
- All automation, CI, AI harness
TUI 가 적합한 환경
Where TUI fits
- SSH·서버·GPU 없는 환경
- SSH / servers / no GPU
- 설치 manifest 빠른 점검
- Quick install manifest check
- IDE 안에서 토글 (tmux split)
- Inside IDE (tmux split)
- JSON 출력 없이 사람이 읽기
- Human-readable, no JSON
10. 같은 작업, 다른 인터페이스 — CLI 매핑
10. Same task, different surface — CLI mapping
왼쪽 GUI 동작 = 오른쪽 CLI 명령. 자동화·스크립트가 필요할 때 그대로 옮겨 쓸 수 있습니다.
GUI action on the left = CLI command on the right. Drop these into scripts as-is.
11. 트러블슈팅
11. Troubleshooting
원인: WebKit 의존 라이브러리(libwebkit2gtk-4.1) 부재 또는 GPU/DRI3 미지원. 헤드리스 서버에선 정상 — 데스크톱 환경에서 실행하세요. 일반 데스크톱이면 libwebkit2gtk-4.1 설치 후 재시도.
Cause: missing libwebkit2gtk-4.1 or no GPU/DRI3. Expected on headless servers — run on a desktop environment. Otherwise install libwebkit2gtk-4.1 and retry.
원인: 데몬이 떠 있지 않거나 포트 충돌. xgram status 로 데몬 상태 확인. 필요하면 xgram daemon restart.
Cause: daemon not running or port conflict. Check xgram status; xgram daemon restart if needed.
원인: BGE-small 모델이 다운로드되지 않음. 첫 회상 시 ~120MB 자동 다운로드. 방화벽 환경이면 xgram model fetch --offline-tarball ./bge-small.tar.gz 로 오프라인 설치.
Cause: BGE-small model missing. ~120MB auto-downloads on first recall. Behind a firewall use xgram model fetch --offline-tarball ./bge-small.tar.gz.
원인: 잘못된 토큰 또는 네트워크 차단. Telegram 은 https://api.telegram.org, Discord 는 https://discord.com/api outbound 가 필요합니다.
Cause: bad token or blocked outbound. Telegram needs https://api.telegram.org, Discord needs https://discord.com/api.
원인: 자동 polling 대신 수동 갱신. 화면의 "새로고침" 버튼을 누르거나 다른 탭에서 돌아오면 다시 fetch 합니다.
Cause: refresh is manual. Click "Refresh" or revisit the tab to re-fetch.
원인: cron 표현은 KST 기준입니다. 서버 TZ 가 UTC 면 9 시간 차이 — KST 그대로 입력하세요.
Cause: cron is interpreted in KST. If your server is UTC, that's a 9-hour offset — enter KST as-is.
다음으로
What's next
- /guide/ — 10 튜토리얼 + FAQ + 트러블슈팅 (전체 사용 가이드)
- /guide/ — 10 tutorials + FAQ + troubleshooting (full guide)
- /quickstart/ — 명령어 카탈로그 (한 화면 요약)
- /quickstart/ — command catalog (one-page summary)
- /architecture/ — 5 층 메모리 + Vault 내부 구조
- /architecture/ — 5-layer memory + vault internals
- /onboard/ — AI 에 붙여넣기 한 번으로 시작
- /onboard/ — paste once into your AI to start