Guide — 10 튜토리얼 + FAQ + 트러블슈팅
Guide — 10 tutorials + FAQ + troubleshooting
Quickstart 가 명령어 카탈로그라면, 이 페이지는 실제로 사용자가 화면을 보면서 그대로 따라할 수 있는 튜토리얼입니다. 첫 설치 → 첫 대화 → 웹/터미널 AI 연동 → 메신저 알림 → 다중 에이전트 → 워크플로우 → 백업·키 회전 → GUI 데스크톱 앱 → TUI 터미널 UI 까지 10 단계.
If Quickstart is the command catalog, this page is a walk-through tutorial you can follow on your screen. From first install → first conversation → web/terminal AI hookup → messenger alerts → multi-agent → workflows → backup & key rotation → GUI desktop app → TUI terminal UI. Ten steps.
이 가이드에서 다루는 것
What this guide covers
- 첫 설치 — 5분 안에 작동 확인First install — running in 5 minutes
- 첫 대화 저장 + 회상First conversation save + recall
- 웹 AI (Claude · ChatGPT · Gemini) 연동 — 3가지 방법Web AI (Claude · ChatGPT · Gemini) — 3 ways
- 터미널 AI 하네스 (Claude Code · Cursor · Aider)Terminal AI harness (Claude Code · Cursor · Aider)
- Discord · Telegram 연결 — 처음부터Discord · Telegram setup — from zero
- 다중 에이전트 채팅방 — Channel MCPMulti-agent chat — Channel MCP
- 예약 + 체인 메시지 (워크플로우)Scheduling + chain messages (workflows)
- 백업 · 복구 · 키 회전Backup · restore · key rotation
- GUI 데스크톱 앱 (Tauri)GUI desktop app (Tauri)
- TUI 터미널 UI (xgram tui)TUI terminal UI (xgram tui)
- FAQ — 자주 묻는 질문FAQ — frequently asked
- 트러블슈팅Troubleshooting
전체 명령은 /quickstart/ 와 /docs/ 에서 인덱싱되어 있습니다. 이 가이드는 "무엇을 누르면 무엇이 나오는가" 흐름에 집중합니다.
All commands are indexed at /quickstart/ and /docs/. This page focuses on the "press X, see Y" flow.
첫 설치 — 5분 안에 작동 확인
First install — running in 5 minutes
리눅스/macOS 셸 한 줄로 설치합니다. Windows 는 WSL2 를 추천합니다.
One shell line on Linux/macOS. For Windows we recommend WSL2.
install.sh 실행
Run install.sh
$ curl -sSfL https://openxgram.org/install.sh | sh
# 사용자 홈에 ~/.openxgram/bin/xgram 바이너리 설치
# PATH 안내 메시지가 출력됩니다 — 한 번만 따라하면 됩니다

$ xgram --version
# openxgram 0.2.0
설치 스크립트가 PATH 추가를 안내합니다. command not found 가 뜨면 트러블슈팅 섹션을 먼저 보세요.
The installer prints a PATH hint. If you see command not found, jump to the troubleshooting section.
신원 만들기 (xgram init)
Create your identity (xgram init)
$ xgram init --alias my-laptop
# 출력 예:
#   ✓ master keypair generated (secp256k1)
#   ✓ vault sealed
#
#   12-word recovery phrase (write this down OFFLINE):
#     ribbon glance carbon ... (12 words)
#
#   다시 보여주지 않습니다. 종이/금고에 적어두세요.
--alias my-laptop 의 my-laptop 은 예시 — 그대로 따라 쓸 게 아니라 이 기기를 부를 이름을 본인이 정해서 넣습니다.
한 명의 사용자가 노트북·데스크톱·서버 등 여러 대를 같은 마스터 신원으로 묶을 때 어느 기기에서 일어난 일인지 구분하는 라벨이고,
메모리(L0 messages, L1 episodes) 출처·Vault ACL 머신 화이트리스트·감사 로그 서명 메타데이터에 모두 이 이름이 박힙니다.
예시:
macbook-air · home-desktop · work-thinkpad · gcp-vm-tokyo.
제약: 빈 문자열 불가 · [a-z0-9-] 권장 · 같은 머신에서 두 번째 init 은 --force 필요.
로컬 식별자이므로 다른 사용자가 같은 alias 를 써도 충돌하지 않습니다 (글로벌 신원은 did:key).
--alias my-laptop — my-laptop is an example, not a literal value. Pick your own name for this machine.
When one user runs OpenXgram on several devices under the same master identity, the alias labels which device an event came from,
and ends up in memory provenance (L0 messages, L1 episodes), Vault ACL machine whitelist, and audit-log signature metadata.
Examples:
macbook-air, home-desktop, work-thinkpad, gcp-vm-tokyo.
Constraints: non-empty · [a-z0-9-] recommended · re-running init on the same machine needs --force.
It's a local identifier, so collisions across users are fine (global identity is did:key).
어떤 파일이 어디에 생기는가
Where files land
$ ls -la ~/.openxgram/
# bin/             ← xgram 바이너리
# config/          ← config.toml (별칭, peer 목록)
# data/            ← memory.db (SQLite + sqlite-vec)
# vault/           ← 암호화된 자격증명 (다층 암호화)
# logs/            ← 감사 로그 (append-only, 해시 체인)

$ ls ~/.openxgram/data/
# memory.db (당신의 모든 메시지·기억·임베딩이 여기에)
"외부 전송 0" 직접 검증
Verify "zero outbound" yourself
설치 후 아무 명령이나 실행한 뒤 다음으로 네트워크 연결을 확인하세요. 인터넷으로 나가는 연결이 0 이어야 합니다.
After running any command, inspect network connections. You should see zero outbound connections.
# Linux
$ ss -tnp 2>/dev/null | grep xgram
# (출력 없음 = 외부 전송 0)

$ lsof -i -nP 2>/dev/null | grep xgram
# (출력 없음 = 열린 소켓 없음)

# macOS
$ lsof -i -nP -P | grep xgram
# (역시 비어 있어야 정상)

# 포함 명령 (xgram doctor 가 한 번에 검사)
$ xgram doctor
# ✓ binary OK
# ✓ vault sealed
# ✓ db reachable
# ✓ no outbound sockets
Discord/Telegram 알림을 켰을 때만 outbound 가 생깁니다 (api.telegram.org / discord.com). 의도치 않은 도메인이 보이면 즉시 보고 부탁드립니다.
Outbound traffic only appears when you enable Discord/Telegram notifications (api.telegram.org / discord.com). Report any other domain immediately.
첫 대화 저장 + 회상
First conversation save + recall
OpenXgram 의 핵심 사이클: 세션 만들기 → 메시지 추가 → 시맨틱 회상.
The OpenXgram core loop: create a session → add messages → semantic recall.
세션 시작
Start a session
$ xgram session new "주간 회고"
# {"session_id":"01HXAB...","title":"주간 회고","created_at":"2026-05-04T10:00:00+09:00"}
session_id 를 어딘가에 복사해두세요 (다음 단계에서 사용).
Copy the session_id — you'll use it in the next step.
메시지 추가 (양쪽 모두)
Add messages (both sides)
$ SID="01HXAB..."
$ xgram session message --session-id $SID --sender me \
    --body "이번 주 OpenXgram 가이드 페이지를 작성했다."
$ xgram session message --session-id $SID --sender claude \
    --body "좋네요. 다음 주는 GUI 쪽을 마무리합시다."
sender 는 자유 문자열입니다. me · claude · chatgpt · starian 등 — 나중에 누가 말했는지 회상 결과에 그대로 표시됩니다.
The sender field is a free string — me, claude, chatgpt, starian, etc. It shows up verbatim in recall output.
시맨틱 회상
Semantic recall
$ xgram session recall --query "가이드 작업" -k 5
# 출력 예:
# 1. score=0.91  sender=me     time=2026-05-04T10:01
#    snippet: "이번 주 OpenXgram 가이드 페이지를 작성했다."
# 2. score=0.78  sender=claude  time=2026-05-04T10:02
#    snippet: "좋네요. 다음 주는 GUI..."
결과 해석 —
score 는 코사인 유사도 (0~1). 0.7 이상이면 강한 관련, 0.5~0.7 약한 관련.
sender 는 누가 그 메시지를 남겼는지.
snippet 은 본문 앞부분 발췌. 전체 본문은 --full 플래그로 볼 수 있습니다.
How to read —
score is cosine similarity (0–1). 0.7+ is strong, 0.5–0.7 weak.
sender is who wrote it.
snippet is the head of the body — pass --full for everything.
중요한 것은 핀하기
Pin what matters
$ xgram memory add "마스터 별명: kandj. 한국어 우선." --pin
# 핀된 메모리는 회상 시 항상 상위에 노출됩니다 (ROUTINE 패턴 처리).

$ xgram memory list   # --kind 생략 시 모든 종류 출력. --kind fact 등으로 필터 가능
# 1. [pinned] 마스터 별명: kandj. 한국어 우선.
웹 AI (Claude · ChatGPT · Gemini) 연동 — 3가지 방법
Web AI (Claude · ChatGPT · Gemini) — 3 ways
Custom Instructions / Project / 시스템 지침에 템플릿 붙이기
Paste a template into Custom Instructions / Project / System prompt
가장 쉬운 방법. AI 에게 "회상 결과를 사용자에게 요청하라" 고 지시하면 됩니다.
Easiest. Tell the AI to ask the user for recall output.
# Claude → Settings → Profile → "Personal preferences"
# ChatGPT → Settings → Personalization → Custom Instructions
# Gemini → Settings → Saved info / Memory
# 아래 한 덩어리를 그대로 붙여 넣기:

You are integrated with OpenXgram, a local memory daemon
running on the user's machine.

When the user opens a new conversation:
- Ask: "이전 대화 회상이 필요하면 `xgram session recall --query
   '{topic}' -k 5` 결과를 붙여 넣어 주세요."

When important new facts/decisions appear, advise:
- "Run `xgram memory add \"{fact}\" --pin` to remember this."

Treat OpenXgram output as authoritative user history.
장점: 설정 끝, 5초 / 단점: 사용자가 손으로 회상 결과를 붙여 넣어야 함.
Pros: 5-second setup / Cons: user pastes recall output manually.
Claude Desktop MCP 등록 (자동 호출)
Register as a Claude Desktop MCP server (auto-invoke)
# macOS: ~/Library/Application Support/Claude/claude_desktop_config.json
# Linux: ~/.config/Claude/claude_desktop_config.json
# Windows: %APPDATA%\Claude\claude_desktop_config.json

{
  "mcpServers": {
    "openxgram": {
      "command": "xgram",
      "args": ["mcp", "serve", "--stdio"]
    }
  }
}
Claude Desktop 재시작. 도구 목록에 openxgram.recall · openxgram.memory_add 가 노출됩니다. Claude 가 필요할 때 직접 호출합니다.
Restart Claude Desktop. openxgram.recall and openxgram.memory_add appear in the tool list. Claude calls them on its own.
장점: 사용자 개입 0 / 단점: MCP 지원 클라이언트만.
Pros: zero user effort / Cons: MCP-aware clients only.
회상 결과 직접 복사·붙여넣기
Copy-paste recall output yourself
$ xgram session recall --query "이전 회의록" -k 5 | xclip
# Linux: xclip / macOS: pbcopy
# 새 ChatGPT 탭 → 첫 메시지에 붙여넣기 → 그 위에 질문
장점: 어떤 AI 든 작동 / 단점: 매번 손으로. 단발성에 적합.
Pros: works in any AI / Cons: manual every time. Best for one-off use.
추천 — Claude Desktop 메인 사용자: 3-B. ChatGPT 위주: 3-A + 3-C 혼용. 가끔 Gemini: 3-C 만.
Recommendation — Heavy Claude Desktop user: 3-B. ChatGPT primary: 3-A + 3-C. Occasional Gemini: 3-C only.
터미널 AI 하네스 (Claude Code · Cursor · Aider)
Terminal AI harness (Claude Code · Cursor · Aider)
이 AI 들은 셸을 직접 칠 수 있으므로 "규칙 파일에 한 번 적어두면 알아서 호출" 합니다.
These agents have shell access, so once you write the rule, they invoke it themselves.
정확한 파일 경로
Exact file paths
# Claude Code (전역)
~/.claude/CLAUDE.md
# Claude Code (프로젝트별)
<repo>/CLAUDE.md

# Cursor
<repo>/.cursorrules
# 또는 새 형식: <repo>/.cursor/rules/*.mdc

# Aider
<repo>/.aiderrules
# 또는 ~/.aider.conf.yml 의 read 항목
풀 템플릿 (그대로 붙여넣기)
Full template (paste as-is)
## OpenXgram 사용 규칙 (절대 준수)

# 1. 새 대화 시작 시 — 무조건 회상
START of every new task:
  $ xgram session recall --query "<current task in 1 line>" -k 5
Use the result as authoritative user context.

# 2. 새 결정·사실·rule 발견 시 — 핀
When the user states a NEW preference / decision / fact:
  $ xgram memory add "<the fact>" --pin

# 3. 작업 시작·완료 시 — 알림
ON task start:
  $ xgram notify discord --title "<task>" --status "start"
ON task complete:
  $ xgram notify discord --title "<task>" --status "done" \
      --summary "<1-line result>"

# 4. 세션이 길어지면 — 정리
EVERY 30 messages or before /clear:
  $ xgram session message --session-id $SID --sender ai --body "<summary>"
모델 갈아탈 때
When you swap the model
Claude Sonnet 4.7 로 작업하다 Cursor 로 옮겨도, OpenXgram 자체는 동일 머신에 있고 같은 DB 를 봅니다. 새 모델이 첫 메시지에서 xgram session recall 만 치면 이전 컨텍스트 그대로 이어갑니다.
Move from Claude Sonnet 4.7 to Cursor — OpenXgram is on the same machine reading the same DB. The new model just runs xgram session recall on its first turn and picks up where the last one left off.
# 시연: Claude Code 에서 작업 → Cursor 로 갈아탐
$ # Claude Code 마지막 턴이 자동으로:
$ xgram session message --session-id $SID --sender claude \
    --body "세션 요약: ...4.7 까지 한 일..."

# Cursor 첫 턴이 (.cursorrules 규칙대로):
$ xgram session recall --query "방금 하던 작업" -k 10
# → Cursor 가 마지막 메시지 + 직전 5턴 컨텍스트를 그대로 본다.
Discord · Telegram 연결 — 처음부터
Discord · Telegram setup — from zero
가장 빠른 길은 xgram notify setup 마법사입니다. 봇 토큰만 붙여넣으면 검증·저장·테스트까지 자동.
The fastest path is the xgram notify setup wizard — paste a token, it validates, stores, and sends a test ping.
Telegram — BotFather 화면 그대로
Telegram — BotFather, click by click
# 1) Telegram 앱에서 @BotFather 검색 → /start
# 2) 입력: /newbot
# 3) 봇 표시이름: My OpenXgram Bot   (나중에 변경 가능)
# 4) 봇 username: my_openxgram_bot   (반드시 _bot 으로 끝나야 함)
# 5) BotFather 응답 메시지에서 토큰 복사:
#    1234567890:ABC-DEF1234ghIklzyx57W2v1u123ew11
# 6) 자기 봇과 1회 대화 → /start  (chat_id 받기 위함)
# 7) 셸로 돌아와서:
$ xgram notify setup
# 마법사가 묻습니다:
#   ? Platform: telegram
#   ? Bot token: (붙여넣기)
#   ? 테스트 메시지를 보낼까요? Y
# 자동으로 chat_id 를 발견하고 vault 에 봉인합니다.
# 휴대폰에 "✓ OpenXgram connected" 도착.
Discord — 개발자 포털 단계별
Discord — developer portal step by step
# 1) https://discord.com/developers/applications → "New Application"
#    이름: my-openxgram (자유)
# 2) 좌측 "Bot" 메뉴 → "Add Bot" → "Yes, do it!"
# 3) Token → "Reset Token" → 새 토큰 표시 → 복사
#    (한 번만 보이므로 즉시 메모)
# 4) 같은 페이지 아래로 스크롤:
#    Privileged Gateway Intents
#      [✓] MESSAGE CONTENT INTENT  ← 반드시 켜기 (수신용)
# 5) 좌측 "OAuth2" → "URL Generator"
#    Scopes: [✓] bot
#    Bot Permissions:
#      [✓] Send Messages
#      [✓] Read Message History
#      [✓] View Channels
# 6) 생성된 URL 을 브라우저로 → 자기 서버에 봇 초대
# 7) 셸로 돌아와서:
$ xgram notify setup
#   ? Platform: discord
#   ? Bot token: (붙여넣기)
# 채널 ID 도 묻습니다 (Discord → 우클릭 채널 → "ID 복사").
마법사 vs 수동 설정
Wizard vs manual
# 마법사 (권장)
$ xgram notify setup

# 수동 (스크립트로 자동화하고 싶을 때)
$ xgram vault put telegram.bot_token "1234:ABC..."
$ xgram vault put telegram.chat_id "6565914284"
$ xgram notify telegram --title "Hello" --body "테스트"
마법사는 토큰 검증 + chat_id 자동 발견 + 테스트 메시지 송신을 한 번에 합니다. 수동은 모든 값을 사용자가 알 때만 쓰세요.
The wizard validates the token, auto-detects chat_id, and sends a test ping in one go. Use manual only when you already know every value.
받기 (인바운드) + 데몬 모드
Receive (inbound) + daemon mode
# 포그라운드 (관찰용)
$ xgram telegram-listen
$ xgram discord-listen

# 백그라운드 데몬 (시스템 부팅 시 자동 시작)
$ xgram daemon install --service notify-listen
# systemd unit 파일을 ~/.config/systemd/user/ 에 설치합니다.
$ systemctl --user enable --now xgram-notify-listen
다중 에이전트 채팅방 — Channel MCP
Multi-agent chat — Channel MCP
여러 AI 에이전트(Starian · Eno · Kai 등)가 같은 OpenXgram 허브를 통해 서로 메시지를 주고받습니다.
Multiple AI agents (Starian · Eno · Kai …) talk to each other through one OpenXgram hub.
허브 시작
Start the hub
$ xgram channel serve --port 8765
# JSON-RPC over HTTP 가 :8765/mcp 에 노출됩니다.
# Bearer 토큰이 vault 에 자동 발급됩니다.

$ xgram mcp tokens list
# 1. starian-token  (created 2026-05-04)
# 2. eno-token      (created 2026-05-04)
peer 등록
Register peers
# 환경변수 (또는 ~/.openxgram/config/config.toml)
$ export XGRAM_CHANNEL_PEERS="starian@http://hub:8765,eno@http://hub:8765,kai@http://hub:8765"

# 또는
$ xgram channel peer add --role starian --endpoint http://hub:8765/mcp \
    --token "$(xgram mcp tokens issue --role starian)"
다른 AI 가 호출하는 방법
How another AI calls in
# MCP JSON-RPC 표준 — POST /mcp
$ curl -X POST http://hub:8765/mcp \
    -H "Authorization: Bearer eno-token-..." \
    -H "Content-Type: application/json" \
    -d '{
      "jsonrpc":"2.0", "id":1,
      "method":"tools/call",
      "params":{
        "name":"send_message",
        "arguments":{"to":"starian","summary":"빌드 완료","type":"result"}
      }
    }'
시나리오 — Starian + Eno + Kai 가 같이 일함
Scenario — Starian + Eno + Kai working together
# 1) Starian (오케스트레이터) → Eno (코딩) 작업 요청
starian: send_message(to="eno", summary="가이드 페이지 빌드", type="request")

# 2) Eno 가 빌드 끝나면 → Starian + Kai (운영) 양쪽에 보고
eno: send_message(to="starian", summary="빌드 OK", type="result")
eno: send_message(to="kai", summary="배포 부탁", type="request")

# 3) Kai 가 배포 + 헬스 체크 → 마스터에게 최종 보고
kai:  send_message(to="master", summary="https://openxgram.org/guide/ live")
모든 메시지가 OpenXgram 의 같은 DB(L0 messages 레이어) 에 기록되므로, 한 명이 다른 한 명의 컨텍스트를 그대로 회상할 수 있습니다.
Every message lands in the same DB (L0 messages layer), so any agent can recall any other agent's context.
예약 + 체인 메시지 (워크플로우)
Scheduling + chain messages (workflows)
일회성 예약
One-shot schedule
$ xgram schedule once --at "2026-05-05T09:00:00+09:00" \
    --target-kind role --target master \
    --text "오늘 할 일 3가지를 확인하세요."
cron 반복 예약
Recurring cron
$ xgram schedule cron "0 9 * * MON" \
    --target-kind role --target master \
    --text "지난주 회상: xgram session recall --query 'last week' -k 10"

$ xgram schedule list
# 1. cron  "0 9 * * MON"  → notify telegram (next: 2026-05-11 09:00 KST)
chain.yaml 작성 (실 예시)
Write a chain.yaml (real example)
# ~/morning-routine.yaml
name: morning-routine
steps:
  - id: recall
    run: xgram session recall --query "yesterday" -k 10
    capture: stdout

  - id: notify-summary
    notify: discord
    title: "Good morning"
    body: "{{ steps.recall.stdout }}"

  - id: ask-claude
    peer: claude
    prompt: "오늘 우선순위 3개를 정해줘. 어제 컨텍스트: {{ steps.recall.stdout }}"
    capture: response

  - id: pin-priorities
    run: xgram memory add "오늘 우선순위: {{ steps.ask-claude.response }}" --pin
$ xgram chain run ~/morning-routine.yaml
# 각 step 의 stdout 이 실시간으로 출력되고
# 마지막에 전체 그래프가 ~/.openxgram/data/chains/<run-id>.json 에 기록됩니다.
백업 · 복구 · 키 회전
Backup · restore · key rotation
백업 만들기 (age 다중 수신자)
Create a backup (age multi-recipient)
$ xgram backup create --out ~/openxgram-backup-2026-05-04.age \
    --recipient "age1qz..." \
    --recipient "age1xy..."
# memory.db + vault + config + logs 를 묶어서 age 로 암호화.
# recipient 가 여러 개면 그중 하나의 비밀키만 있어도 복호화됩니다.
변조 검출 (audit verify)
Tamper check (audit verify)
$ xgram audit verify
# 출력 예:
# ✓ logs append-only chain OK (12,481 entries)
# ✓ vault HMAC OK
# ✓ memory.db row hashes OK
# ✗ message #1043 hash mismatch  ← 변조 의심
모든 메시지·결정·로그는 해시 체인으로 묶여 있어, 누가 디스크에 직접 손을 대면 즉시 잡힙니다.
Every message, decision, and log line is hash-chained — anyone tampering with the disk gets caught immediately.
KEK 회전 (HD wallet)
Rotate KEK (HD wallet)
$ xgram vault rotate-kek
# 마스터 시드에서 다음 derivation path 의 KEK 를 만들고
# vault 안의 모든 필드를 새 KEK 로 재암호화합니다.
# 마스터 시드는 변하지 않으므로 12-단어 복구 시드는 그대로 유효.

$ xgram vault history
# kek-1  retired  2026-05-04
# kek-2  active   2026-05-04
새 머신으로 복구
Restore on a new machine
# 새 머신:
$ curl -sSfL https://openxgram.org/install.sh | sh
$ xgram init --restore
# 마법사가 12-단어 시드를 묻습니다 → 입력

$ xgram backup restore ~/openxgram-backup-2026-05-04.age
# memory.db / vault / config / logs 가 복원됩니다.

$ xgram doctor
# ✓ identity matches recovered seed
# ✓ vault unsealed
# ✓ db integrity OK
GUI 데스크톱 앱 (Tauri)
GUI desktop app (Tauri)
CLI 가 부담스럽다면 Tauri 기반 데스크톱 앱으로 같은 기능을 시각적으로 사용할 수 있습니다. Linux · macOS · Windows 모두 지원되며, 9 개 탭으로 메모리 검색·자격 승인·피어 추가·메신저 마법사·체인 워크플로우·결제 한도까지 한 화면에 모입니다.
If the CLI feels heavy, the Tauri desktop app exposes the same functionality with a visual UI. Runs on Linux · macOS · Windows. Nine tabs cover memory search, vault approval, peer registration, messenger wizards, chain workflows, and payment limits — all in one window.
빌드 (소스에서) — GUI 한정
Build from source — GUI only
참고: CLI 는 5 플랫폼 모두 사전 빌드가 있습니다 (Tutorial 1 의 install.sh). 아직 사전 빌드가 없는 것은 Tauri GUI 데스크톱 앱뿐 — 직접 빌드합니다 (~5분 소요).
Note: the CLI ships pre-built for all 5 platforms (see Tutorial 1's install.sh). Only the Tauri GUI desktop app still requires building from source (~5 min).
# Linux 의존 (Ubuntu/Debian 기준)
$ sudo apt install libwebkit2gtk-4.1-dev libgtk-3-dev libsoup-3.0-dev
# macOS / Windows 는 추가 의존 없음 (WebKit / WebView2 OS 기본)

$ git clone https://github.com/openxgram/openxgram && cd openxgram
$ cargo install tauri-cli --version "^2.0"
$ cd ui/tauri && cargo tauri build
# 산출물:
#   Linux:   target/release/bundle/deb/*.deb · appimage/*.AppImage
#   macOS:   target/release/bundle/dmg/*.dmg · macos/OpenXgram.app
#   Windows: target/release/bundle/msi/*.msi (cross-build 시)
개발 모드 (빠른 시작)
Dev mode (fast start)
$ cd ui/tauri && cargo tauri dev
# Vite + Solid 가 핫 리로드로 뜨고, Tauri 가 데스크톱 창을 자동 오픈합니다.
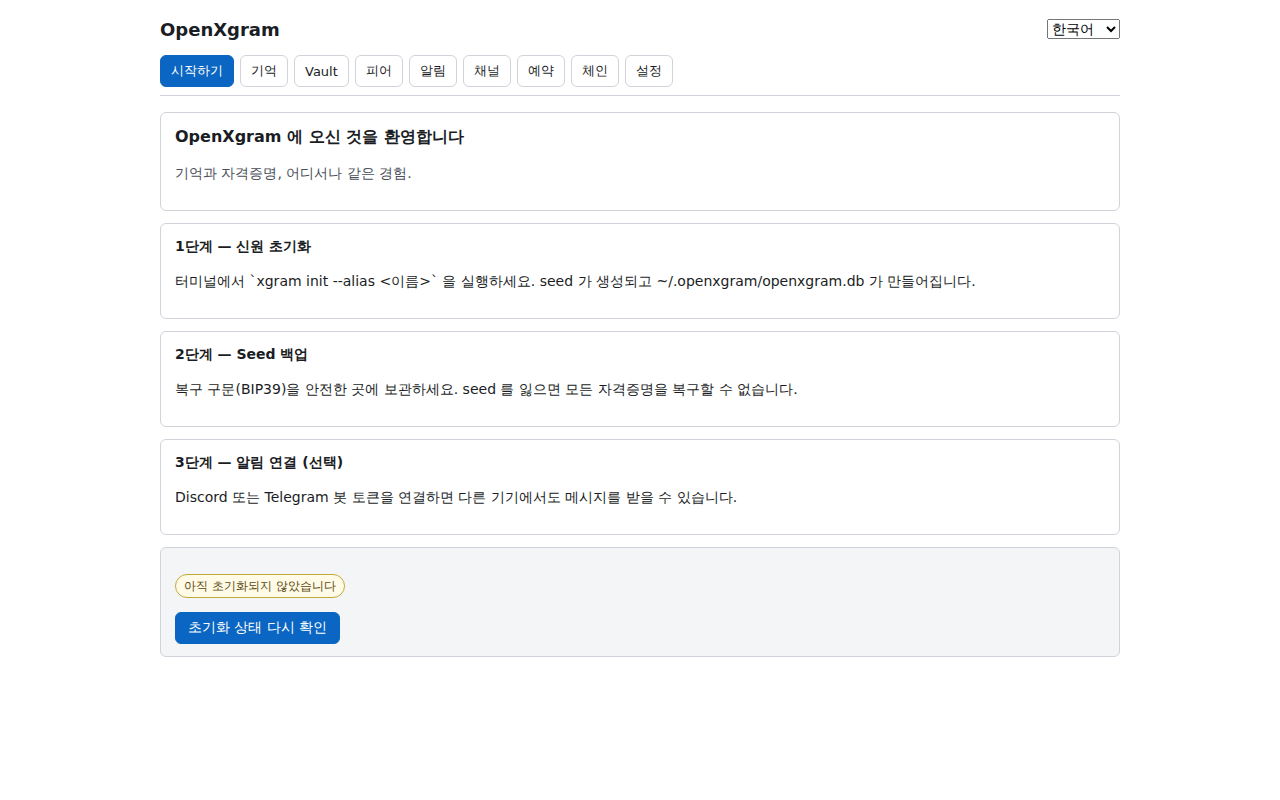
첫 실행 — Onboarding 자동
First run — automatic onboarding
앱을 처음 켜면 Onboarding 탭으로 시작합니다. xgram init 이 안 끝났으면
아직 준비되지 않음 배지가 보이고, 끝나 있으면 자동으로 Memory 탭으로 전환됩니다.
On first launch the app opens the Onboarding tab. If xgram init hasn't finished
you'll see a not ready badge; once initialized, it auto-switches to the Memory tab.
9 개 탭 — 무엇을 누르면 무엇이 나오는가
The nine tabs — press X, see Y
- Onboarding — 첫 실행 환영 + init 진행 상태 (아직 / 완료) 확인 + Memory 탭으로 자동 진행 버튼.
- Onboarding — welcome screen, init readiness badge, button to proceed to Memory tab.

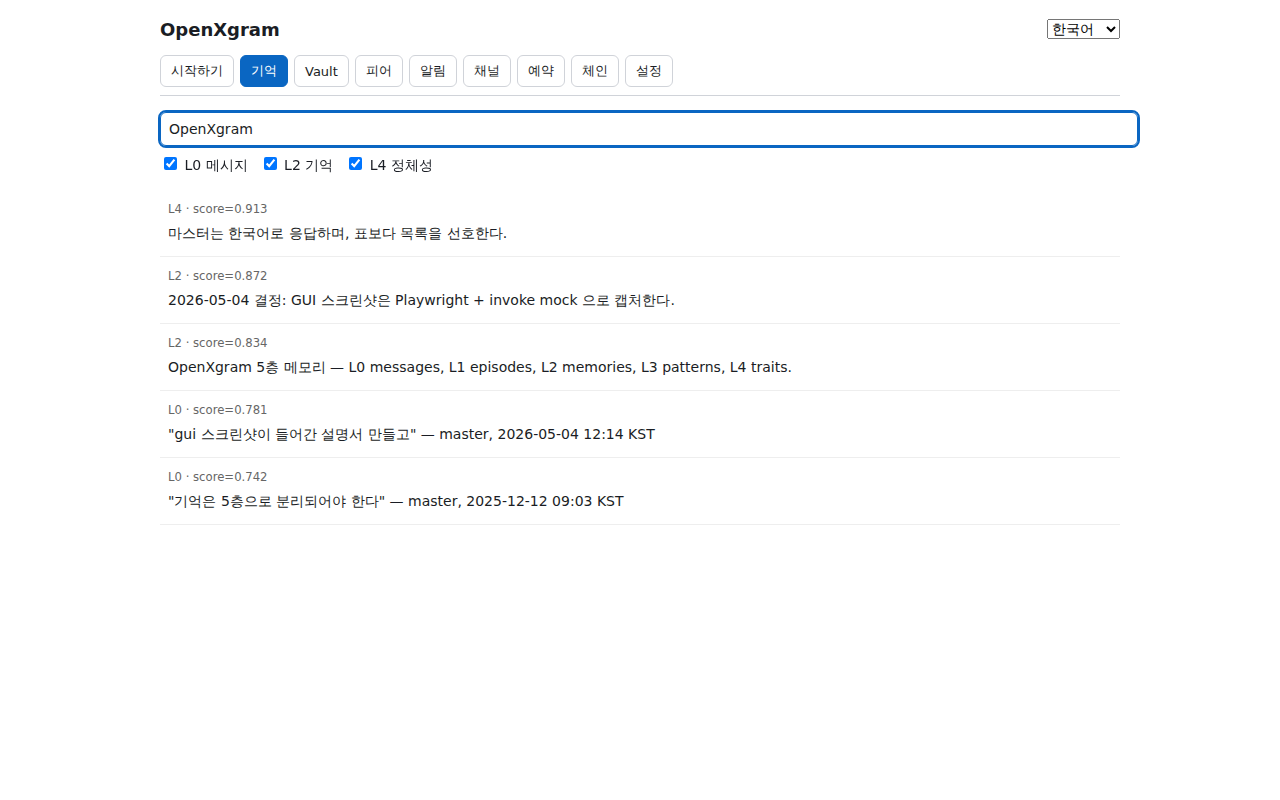
- Memory — 5 층(L0~L4) 검색. 입력은 300ms 디바운스. 체크박스로 L0/L2/L4 레이어 필터, 결과는 점수 정렬로 표시.
- Memory — 5-layer (L0–L4) search with 300ms input debounce. Checkbox layer filters (L0/L2/L4); results sorted by score.
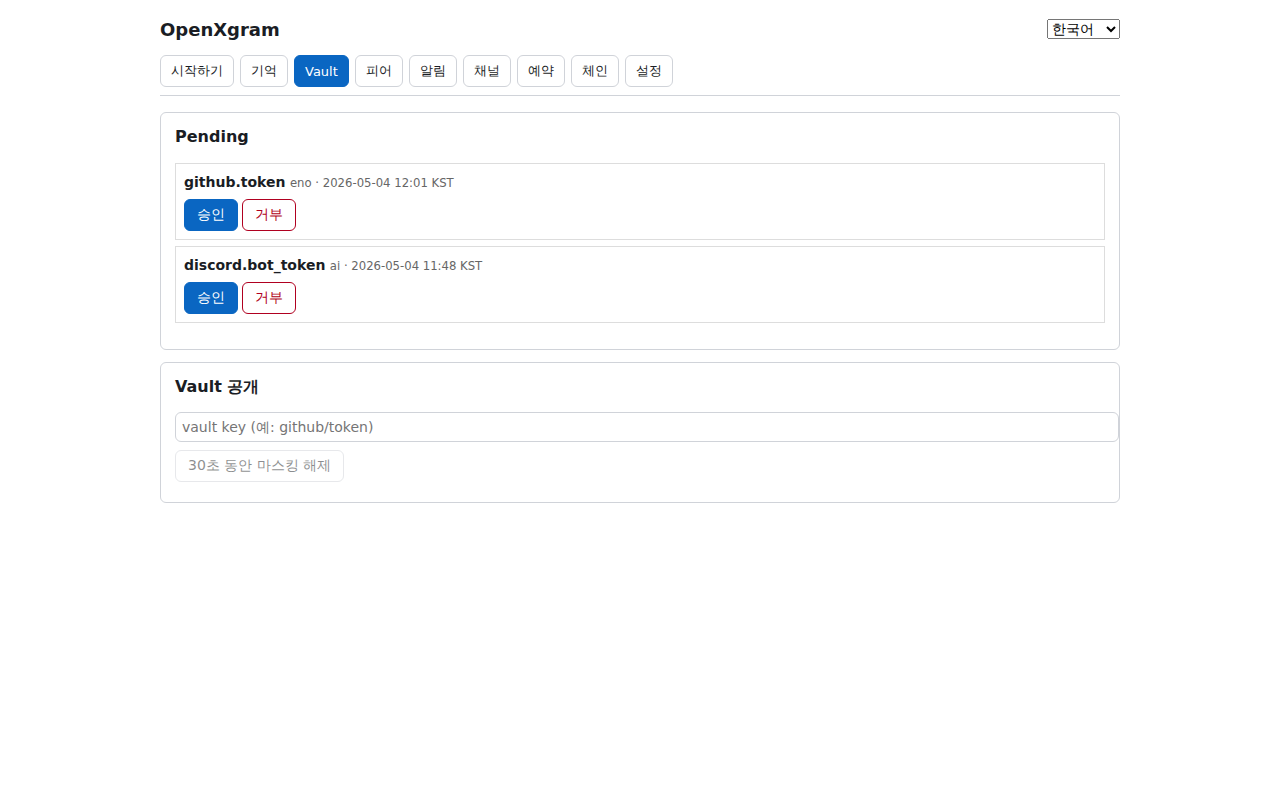
- Vault — Pending 승인/거부 리스트 + 자격증명 reveal. Reveal 시 30초 마스킹 카운트다운 + 클립보드 복사도 30초 후 자동 클리어.
- Vault — pending approval list + credential reveal. Revealed values mask after 30s; clipboard auto-clears 30s after copy.
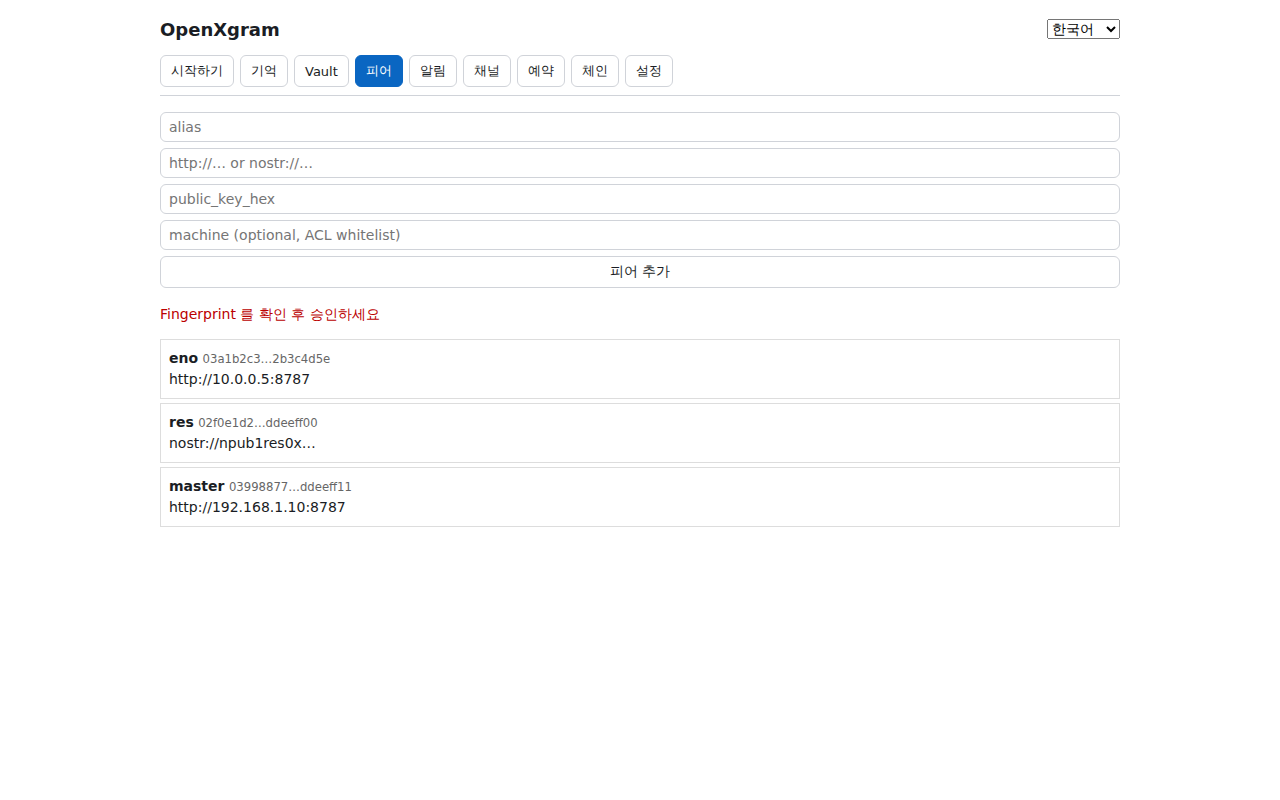
- Peers — 다른 머신·에이전트 추가. 폼에 alias·address·pubkey 입력 → fingerprint 다이얼로그로 검증 후 confirm.
- Peers — register other machines/agents. Enter alias·address·pubkey, then confirm via fingerprint dialog.
- Notify — Discord webhook + Telegram bot 마법사. 토큰 입력 →
getMe검증 →chat_id자동 감지 → 저장 + 테스트 메시지 자동 전송. - Notify — Discord webhook + Telegram bot wizard. Paste token →
getMevalidation → auto-detectchat_id→ save + auto-send test message.

- Channel — 다중 에이전트 허브 라이브 상태. 어댑터 구성 여부, 등록된 peer 수, 예약 메시지 pending 수, 최근 메시지 20건을 KST 타임스탬프로 표시.
- Channel — live multi-agent hub status. Adapter configuration, peer count, pending schedules, last 20 messages with KST timestamps.

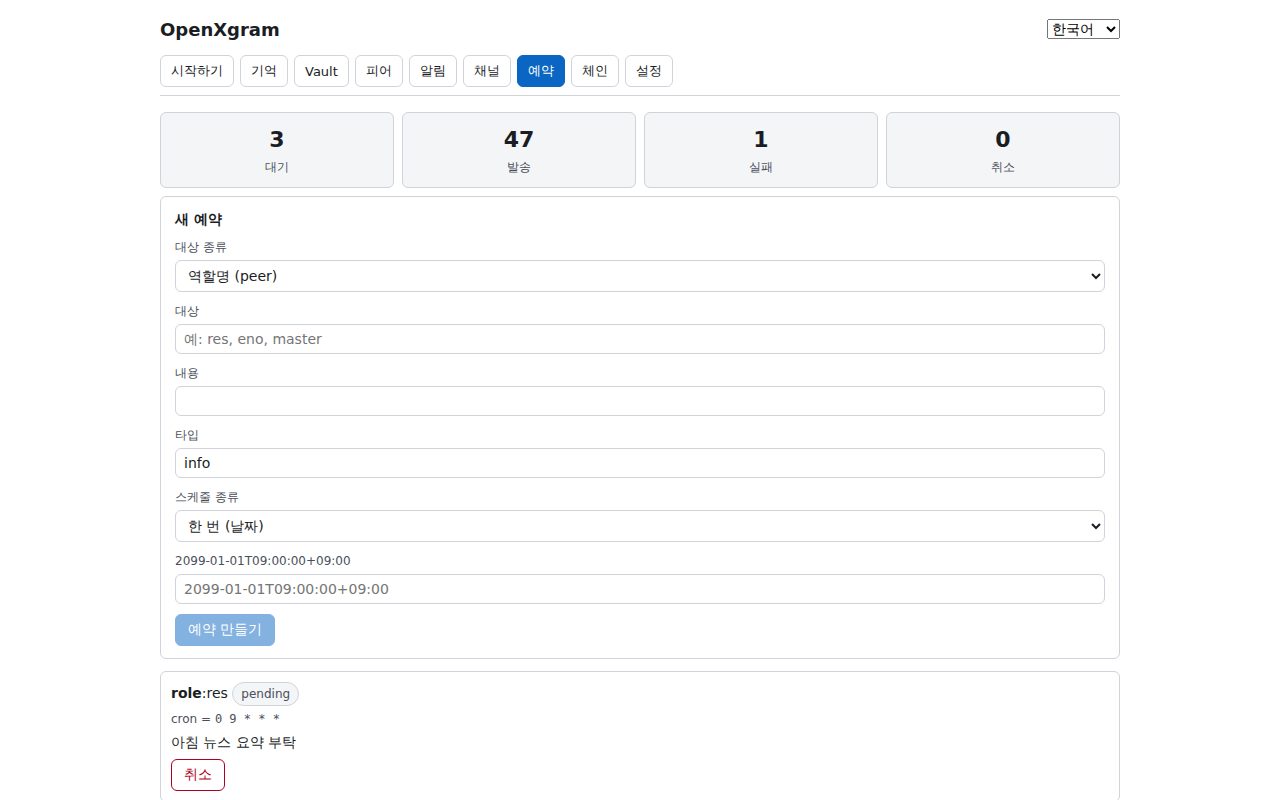
- Schedule — 예약 메시지.
once(특정 시각 1회) 또는cron(반복) 지정. 대기/전송완료/실패/취소 통계와 목록, 개별 취소 버튼. - Schedule — scheduled messages.
once(one-shot) orcron(repeating). Stats for pending/sent/failed/cancelled plus per-row cancel.
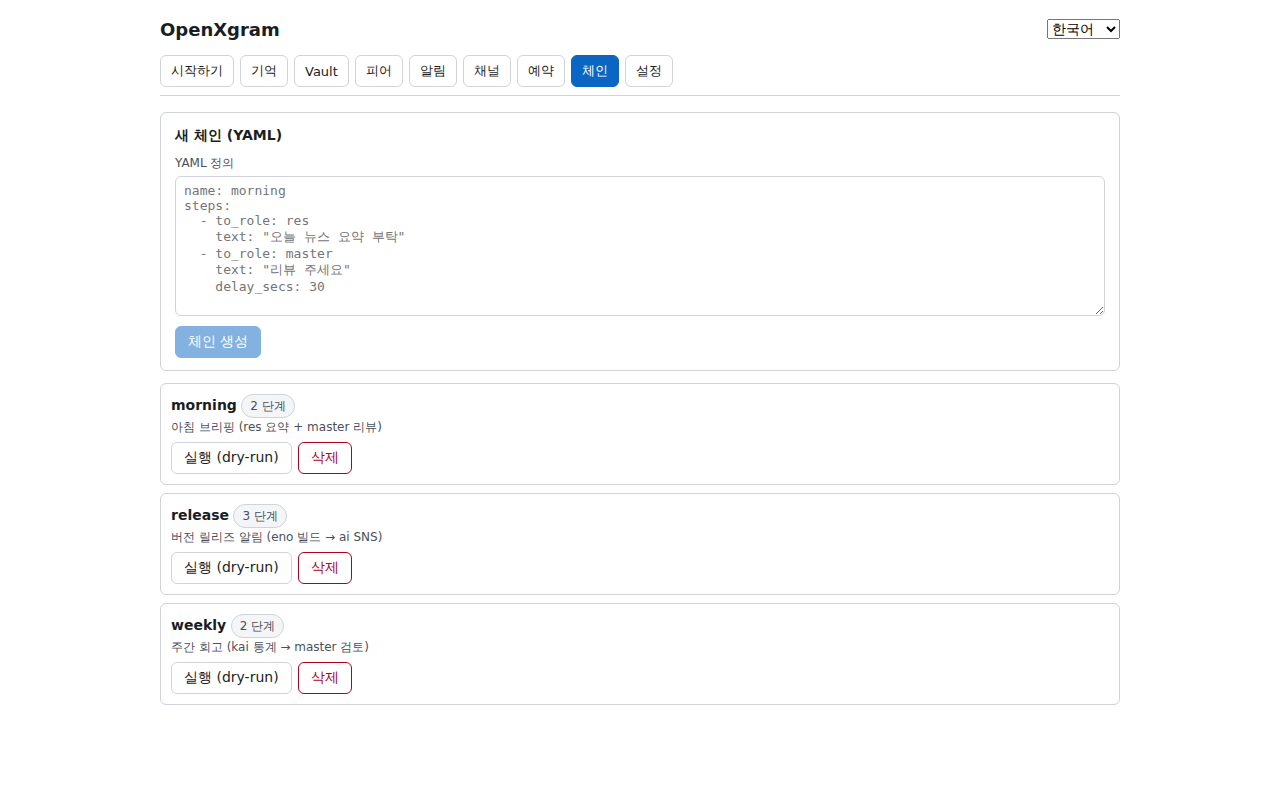
- Chain — 체인 워크플로우. YAML 로 step 정의 → 등록 → 실행 → 각 step 의 응답·실패·skip 결과를 한 화면에서 확인.
- Chain — chain workflows. Define steps in YAML → create → run → see per-step response/error/skip on one screen.
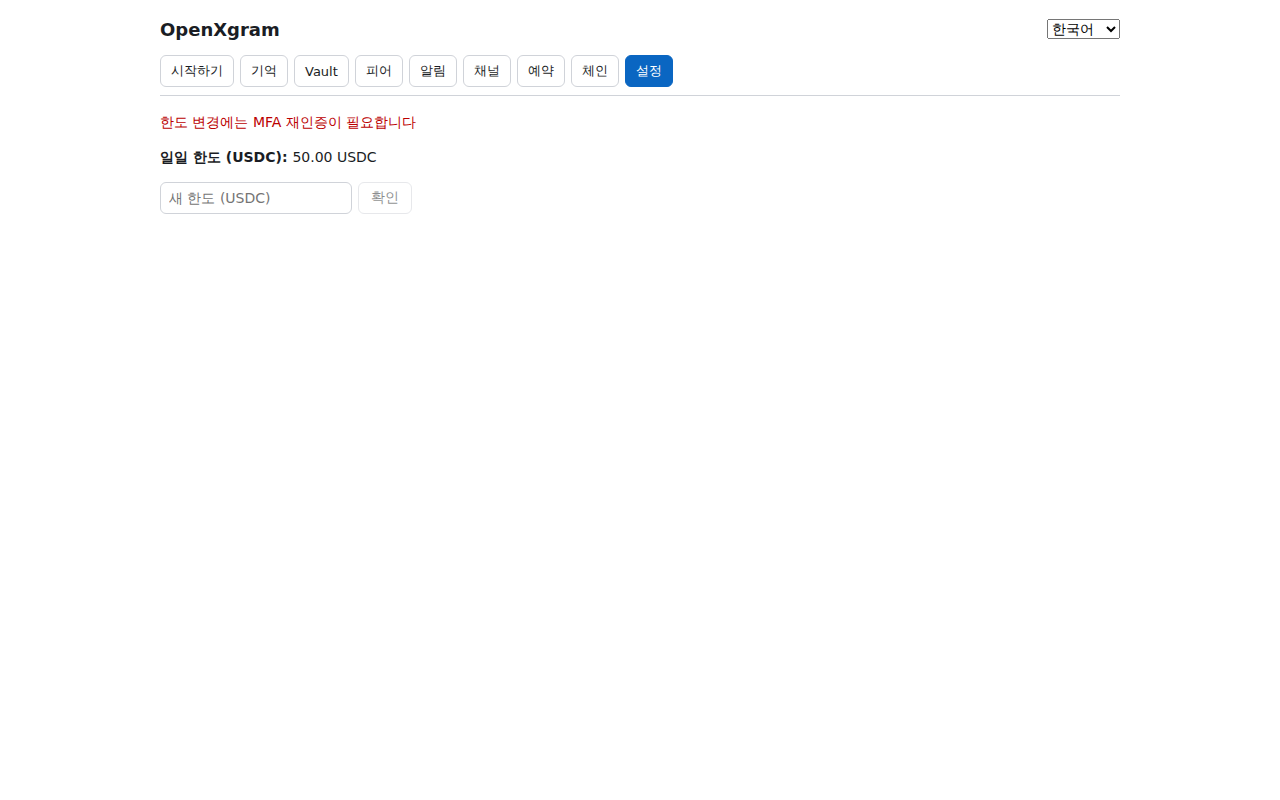
- Settings — 결제 일일 한도(USDC) 설정. 변경 시 MFA 재인증 다이얼로그가 뜹니다 (PRD-MFA-02 통합 시 WebAuthn).
- Settings — daily payment limit (USDC). Changes prompt MFA re-authentication (WebAuthn once PRD-MFA-02 lands).
GUI 만의 장점
What GUI gives you
- 봇 토큰 마법사 — CLI 의 5단계 카드를 클릭 한 번으로 끝내는 토큰 검증 → chat_id 감지 → 저장 → 테스트 흐름.
- Bot-token wizard — collapses the CLI 5-step setup into one click: validate → detect chat_id → save → test.
- Channel 탭의 라이브 메시지 stream — 어떤 에이전트가 무엇을 보냈는지 시간 순으로 한눈에.
- Live Channel-tab message stream — see at a glance who sent what, in time order.
- 비밀번호·시드 입력은 GUI prompt — 터미널 echo 노출 없이 안전하게 표시·복사.
- Password / seed prompts in GUI — no terminal echo, safe to display and copy.
- Vault reveal 의 30초 카운트다운과 자동 클립보드 클리어 — CLI 보다 명확한 시각적 보안 피드백.
- Vault reveal's 30-second countdown and auto-clipboard clear — clearer visual security feedback than the CLI.
같은 데이터, 같은 백엔드
Same data, same backend
Tauri 앱은 별도 데몬을 띄우지 않습니다 — ~/.openxgram/ 의 SQLite·Vault·logs 를 CLI 와 동일하게 직접 사용합니다.
GUI 에서 등록한 peer 는 xgram peer list 에 그대로 보이고, CLI 로 저장한 메모리는 GUI Memory 탭에서 검색됩니다.
The Tauri app does not spawn its own daemon — it reads the same ~/.openxgram/ SQLite·Vault·logs that the CLI uses.
A peer added in the GUI shows up in xgram peer list; a memory saved via CLI is searchable from the GUI Memory tab.
TUI 터미널 UI (xgram tui)
TUI terminal UI (xgram tui)
서버·SSH·헤드리스 환경 등 터미널만 있는 곳에서 GUI 없이 상태를 확인하고 싶을 때 쓰는 화면 모드입니다. ratatui 기반의 가벼운 welcome + status 화면으로 시작하며, 풀-피처 9 단계 마법사는 후속 PR 에서 합쳐집니다 (Phase 1 baseline).
For terminal-only environments (servers, SSH, headless boxes) where you want a quick status check without a GUI. Currently a lightweight ratatui welcome + status screen — the full nine-step interactive wizard lands in a follow-up PR (Phase 1 baseline).
실행
Launch
$ xgram tui
# --data-dir <PATH> 로 데이터 디렉토리 지정 가능 (기본: ~/.openxgram)
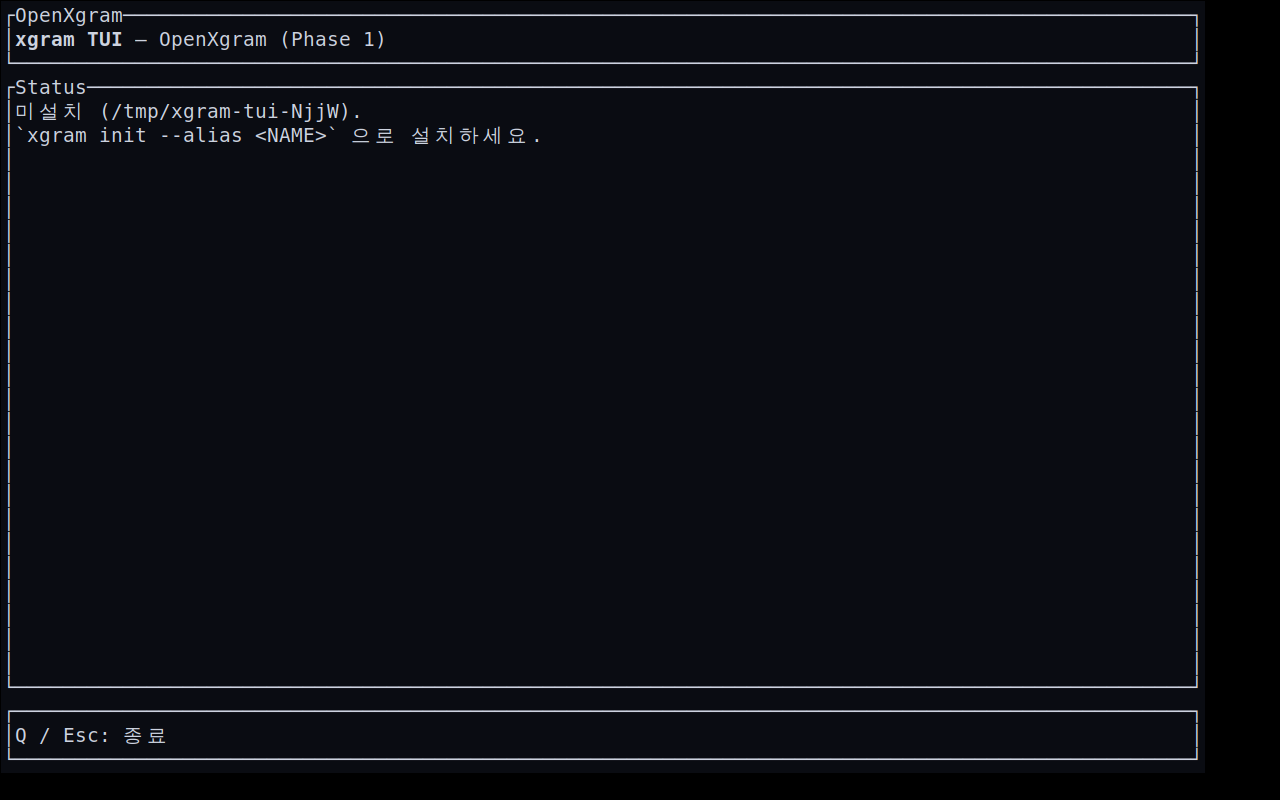
xgram tui — 실제 ratatui 픽셀 캡처 (Xvfb + xterm + scrot).xgram tui in xterm — actual ratatui pixel capture (Xvfb + xterm + scrot).키바인딩
Key bindings
- Q 또는 Esc — 종료 (alternate screen 을 빠져나오며 raw mode 도 자동 해제)
- Q or Esc — exit (leaves the alternate screen and disables raw mode automatically)
Phase 1 의 TUI 는 단일 welcome 화면이라 탭/이동 키는 없습니다. 추가 키바인딩(Tab·화살표·Enter 등)은 SPEC §10 의 9 단계 마법사가 통합되는 후속 PR 에서 도입됩니다 — 현재는 추측 표기를 피하기 위해 실제 동작하는 키만 안내합니다.
Phase 1 TUI is a single welcome screen, so there are no tab/navigation keys yet. Additional bindings (Tab · arrows · Enter) ship with the SPEC §10 nine-step wizard in a follow-up PR — we list only keys that actually work today.
화면 구성
Screen layout
- 헤더 —
xgram TUI — OpenXgram (Phase 1)타이틀 박스. - Header —
xgram TUI — OpenXgram (Phase 1)title box. - Status (본문) —
~/.openxgram/install-manifest.toml을 읽어 설치 상태를 표시. 미설치면xgram init안내, 설치돼 있으면 manifest 정보 (버전·머신·생성 시각) 출력. - Status (body) — reads
~/.openxgram/install-manifest.tomland shows install state. If absent, promptsxgram init; otherwise prints manifest fields (version · machine · created_at). - Footer — 키바인딩 힌트 (
Q · Esc= quit). - Footer — key-binding hint (
Q · Esc= quit).
GUI vs TUI vs CLI — 언제 무엇을 쓰나
GUI vs TUI vs CLI — which one when
- GUI — 처음 사용자, 마법사 기반 봇 토큰 등록, 라이브 메시지 stream, 시각적인 vault 승인 / reveal 작업.
- GUI — first-time users, wizard-driven bot setup, live message stream, visual vault approval / reveal.
- TUI — 터미널만 있는 서버·SSH 세션, 빠른 설치 상태 확인, GUI 의존 라이브러리(WebKit) 가 없는 환경.
- TUI — terminal-only servers / SSH sessions, quick install-state check, environments without GUI deps (WebKit).
- CLI — 자동화·스크립트·CI, 다른 도구와 파이프, AI 하네스(Claude Code · Cursor · Aider) 와 연동.
- CLI — automation, scripts, CI, piping with other tools, AI harness integration (Claude Code · Cursor · Aider).
세 인터페이스 모두 같은 ~/.openxgram/ 데이터를 직접 읽고 씁니다 — GUI 에서 한 작업은 TUI/CLI 에서도 즉시 반영됩니다.
All three interfaces read and write the same ~/.openxgram/ data directly — work done in the GUI shows up immediately in the TUI/CLI.
자주 묻는 질문
Frequently asked
1. 데이터가 정말로 외부에 안 나가나요?
1. Does the data really never leave my machine?
네. 기본 설정에서 xgram 은 어떤 외부 서버에도 연결하지 않습니다. 직접 확인:
Yes. With default settings xgram opens zero outbound connections. Verify yourself:
$ ss -tnp | grep xgram      # Linux
$ lsof -i -nP | grep xgram   # macOS / Linux
$ xgram doctor               # 통합 확인
Discord/Telegram 알림을 켰을 때만 해당 API 도메인으로 outbound 가 발생합니다.
Outbound traffic only opens when you turn on Discord/Telegram notifications, and only to those API domains.
2. Mem0 / Zep 같은 서비스와 뭐가 다른가요?
2. How is this different from Mem0 / Zep?
핵심 차이: 호스팅 SaaS 가 아니라 로컬 단일 바이너리. Mem0/Zep 은 자기네 서버에 데이터를 두지만, OpenXgram 은 사용자 머신에서만 돕니다. 또 OpenXgram 은 메모리뿐 아니라 자격증명(Vault) · 로그 무결성(audit chain) · 결제(USDC) · 다중 에이전트 허브(Channel MCP) 까지 한 바이너리에 통합돼 있습니다.
Key difference: local single binary, not a hosted SaaS. Mem0/Zep keep your data on their servers; OpenXgram never leaves your machine. OpenXgram also bundles credentials (Vault), tamper-evident logs (audit chain), payments (USDC), and a multi-agent hub (Channel MCP) in one binary.
3. 모바일에서도 쓸 수 있나요?
3. Can I use it on mobile?
현재(v0.2.x)는 Discord / Telegram 봇을 통한 알림 수신만 지원합니다. 작성·회상은 데스크톱/노트북/서버에서. 정식 모바일 GUI 는 Phase 2 GUI 로드맵에 있습니다.
Today (v0.2.x) mobile is receive-only via Discord / Telegram bots. Authoring and recall happen on desktop/laptop/server. A native mobile GUI is on the Phase 2 roadmap.
4. 비밀번호(=시드)를 잊어버리면?
4. What if I lose my password / seed?
12-단어 복구 시드를 잃어버리면 vault 해제 방법이 없습니다 — 설계 의도입니다 (백도어 없음). 그래서 xgram init 직후 종이/금고/하드웨어 지갑에 시드를 적어두라고 강조합니다. 다만 memory.db 자체는 vault 와 별개이므로, 시드를 잃어도 평문 메모리는 별도 export 로 살릴 수 있습니다.
If you lose the 12-word phrase, the vault cannot be opened — that's by design (no backdoor). That's why we insist you write the phrase down right after xgram init. Note: memory.db is separate from the vault — even without the seed you can export plaintext memories.
5. 서버를 옮기려면?
5. How do I move to a new server?
Tutorial 8.4 참조. xgram backup create → 새 머신에서 xgram init --restore + xgram backup restore. 5분 안에 완전히 똑같은 신원과 메모리로 부활합니다.
See Tutorial 8.4. xgram backup create → on the new machine, xgram init --restore + xgram backup restore. Same identity, same memories, in under 5 minutes.
6. 여러 사람이 같이 쓸 수 있나요?
6. Can multiple people share an instance?
각자 자기 xgram 을 돌리고 peer 등록으로 연결하는 게 표준입니다 (Tutorial 6). 한 인스턴스를 여러 명이 직접 공유하는 모드는 권장하지 않습니다 — vault 의 ACL 모델이 1 인 기준이기 때문입니다.
The standard model is: each person runs their own xgram, then connects via peer registration (Tutorial 6). Direct multi-user sharing of one instance is discouraged — the vault ACL model is single-owner.
7. 비용은 얼마인가요?
7. What does it cost?
OpenXgram 자체는 무료 오픈소스입니다. 사용자 머신에서만 돌기 때문에 SaaS 요금이 없습니다. USDC 기반 결제는 옵션 — 예약 작업이나 외부 모델 호출 비용을 자기 자기에게/타인에게 정산할 때만 사용합니다.
OpenXgram itself is free and open source. There's no SaaS fee because it runs only on your machine. USDC payments are optional — used only when you want to settle scheduled jobs or external model calls.
8. 오픈소스인가요? 라이선스는?
8. Is it open source? Which license?
네. 전체 코드가 github.com/openxgram/openxgram 에 공개돼 있습니다. 라이선스는 Apache-2.0. 누구든 fork · audit · self-host 가능합니다.
Yes. The entire codebase is at github.com/openxgram/openxgram under Apache-2.0. Anyone can fork, audit, or self-host.
9. 외부 보안 감사를 받았나요?
9. Has it been externally audited?
정직하게: 아직 외부 전문 감사는 받지 않았습니다 (v0.2.x). 알려진 약점은 GitHub SECURITY.md 에 공개적으로 트래킹합니다. 프로덕션 환경에서 민감 데이터를 다루는 경우, 자체 위협 모델 검토 후 사용을 권장합니다.
Honestly: no formal third-party audit yet (v0.2.x). Known weaknesses are tracked openly in SECURITY.md on GitHub. If you handle highly sensitive data in production, please review against your own threat model first.
10. 기여하고 싶어요
10. I'd like to contribute
환영합니다. GitHub repo → CONTRIBUTING.md 를 보세요. 좋은 첫 이슈는 good-first-issue 라벨로 모아두었습니다. 디자인 결정 토론은 docs/decisions/ (ADR) 에서 이루어집니다.
Welcome. Start at the GitHub repo → CONTRIBUTING.md. Look for issues tagged good-first-issue. Design decisions are debated in docs/decisions/ (ADRs).
11. GUI 는 언제 나오나요?
11. When does the GUI ship?
Phase 2 로드맵에 Tauri + React 기반 GUI 가 진행 중입니다. 현재는 TUI(xgram tui)와 CLI 가 주력입니다.
A Tauri + React GUI is in flight on the Phase 2 roadmap. Today the TUI (xgram tui) and the CLI are the primary surfaces.
트러블슈팅
Troubleshooting
원인: PATH 에 ~/.openxgram/bin 이 없음.
Cause: ~/.openxgram/bin is not in PATH.
# bash / zsh — 셸 rc 파일에 한 줄 추가
$ echo 'export PATH="$HOME/.openxgram/bin:$PATH"' >> ~/.zshrc
$ source ~/.zshrc
$ xgram --version
원인: vault 패스워드 입력 오타 또는 KEK 손상. 시드는 안전하므로 패스워드만 다시 시도하세요.
Cause: wrong vault passphrase, or KEK damage. Your seed is safe — just retry the passphrase.
$ xgram vault unseal     # 패스워드 재입력
$ xgram doctor           # vault 상태 확인
# 그래도 실패하면: Tutorial 8.4 (시드로 복구)
원인: Discord 개발자 포털의 MESSAGE CONTENT INTENT 가 꺼져 있음. Tutorial 5-D1 의 4번 단계 참조.
Cause: MESSAGE CONTENT INTENT is off in the Discord Developer Portal. See Tutorial 5-D1 step 4.
모든 사용자 데이터는 ~/.openxgram/ 한 곳에. 이 디렉토리만 백업하면 전체 상태가 백업됩니다.
Everything lives in ~/.openxgram/. Back up that single directory to back up everything.
$ du -sh ~/.openxgram/*
$ xgram doctor   # 위치를 다시 출력해줍니다
$ xgram session list --older-than 90d
$ xgram backup create --out ~/archive-90d.age --filter "older-than 90d"
$ xgram session prune --older-than 90d
# 90일 지난 세션을 백업한 후 DB 에서 제거합니다.
# 기억(memories) 은 별도 보존됩니다 — 메시지(L0)만 정리됩니다.

$ xgram db vacuum
# SQLite 압축
BGE-small 모델은 첫 회상 시 자동 다운로드됩니다 (~120MB). 회사 방화벽 환경이라면 xgram model fetch --offline-tarball ./bge-small.tar.gz 로 오프라인 설치할 수 있습니다.
The BGE-small model auto-downloads on first recall (~120MB). Behind a corporate firewall use xgram model fetch --offline-tarball ./bge-small.tar.gz for offline install.
다음으로
What's next
- /quickstart/ — 명령어 카탈로그 (한 화면 요약)
- /quickstart/ — command catalog (one-page summary)
- /architecture/ — 5층 메모리 + Vault 내부 구조
- /architecture/ — 5-layer memory + vault internals
- /usecases/ — 실제 시나리오 사례
- /usecases/ — real-world scenarios
- /docs/ — 모든 명령 레퍼런스
- /docs/ — full command reference